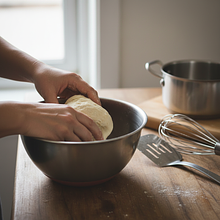
In a large, wide bowl, place all the dry ingredients: 500g of all-purpose flour, 8g of salt (about 1.5 teaspoons), and 5g of baking powder. If using, also add 10g of optional powdered sugar now. Take a large whisk or fork and mix everything very thoroughly for about a minute. We want the salt and baking powder to be evenly distributed throughout the flour - this will ensure that each tortilla is perfect.
Description
Forget about store-bought, stiff, and crumbly tortillas! This recipe is your ticket to the world of perfectly soft, flexible, and delicious homemade tortillas that roll without cracking and serve as the perfect base for your favorite wraps. The secret is using hot water and the right kneading technique, which makes the dough incredibly pliable. These tortillas taste like those from the best restaurants serving Mexican-style dishes, but they are infinitely healthier and made from simple, accessible ingredients. They are perfect for making hearty wraps with chicken, beef, or a veggie version with hummus and vegetables. You can also use them for quesadillas, as a side for soups and salads, or simply serve them warm with your favorite sauces. Making them is easier than you think and provides immense satisfaction!
Ingredients (6)
- Mąka pszenna typ 450 lub 500 500 g
- Gorąca woda 250 ml
- Vegetable oil 60 ml
- Baking powder 5 g
- 🌿 Przyprawy
- Sól drobnoziarnista 1.6 łyżeczki
- ✨ Opcjonalne
- Powdered sugar 10 g
💡 Kliknij na składnik aby oznaczyć jako użyty
Preparation steps
Preparing the dough
Make a well in the center of the dry ingredients, resembling a volcano crater. Pour 60g of vegetable oil and 250ml of very hot water into this well. Be careful not to burn yourself! Take a wooden spoon or a sturdy spatula and start mixing the ingredients, incorporating the flour from the edges into the center, until a thick, sticky mass forms and no dry flour is visible. At first, the dough will be very hot and impossible to knead by hand.
When the dough has cooled slightly enough to touch (after about 2-3 minutes), transfer it from the bowl to a lightly floured countertop or pastry board. Start kneading the dough. Knead it vigorously for about 7-8 minutes. The technique involves pushing the dough away from you with the heel of your hand, folding it in half, and turning it 90 degrees. Repeat this process. The dough is ready when it becomes smooth, very elastic, and soft to the touch, resembling the consistency of playdough or modeling clay. It should not stick to your hands.
Form a smooth ball from the kneaded dough. Place it back in the bowl where you mixed the ingredients. Cover the bowl tightly with plastic wrap or a damp, clean kitchen towel. Let the dough rest on the kitchen counter for at least 30 minutes (preferably for an hour). This step is absolutely crucial! During this time, the gluten in the dough will relax, making the tortillas incredibly easy to roll out into thin discs.
Shaping and frying
After resting, transfer the dough to a countertop and divide it into 8 equal parts. It's best to do this using a kitchen scale so that each tortilla is of similar size (each portion should weigh about 100g). From each part, form a neat, smooth ball by folding the edges underneath. Place the balls on the countertop and cover them again with a cloth to prevent them from drying out while rolling out the next tortillas.
Take one ball of dough and place it on a lightly floured surface. Gently flatten it with your hand. Using a rolling pin, start rolling the dough from the center outwards, regularly turning the dough 45 degrees. Try to achieve the thinnest round shape possible, about 22-24 cm in diameter. The ideal tortilla should be almost transparent. Don't worry if the shape isn't perfectly round – that's the charm of homemade baking!
Heat a large, dry skillet with a thick bottom (cast iron or steel will be ideal) over medium-high heat. The skillet must be really well heated. To check the temperature, sprinkle a few drops of water on it – if the water sizzles and evaporates immediately, the skillet is ready. Do not add any fat!
Carefully transfer the rolled-out tortilla to the hot skillet. Cook for about 30-60 seconds on the first side. Small, then larger air bubbles will start to appear on the surface. When this happens, use a spatula or tongs to flip the tortilla to the other side. Cook for another 30 seconds. The finished tortilla should be pale, with a few lightly browned, toasted spots. Do not cook it too long, as it will become hard and brittle.
This is the most important step for keeping them soft! Prepare a plate and line it with a clean kitchen towel. Immediately after removing each cooked tortilla from the pan, place it on the plate and cover it with the towel right away. Stack the tortillas on top of each other. The steam that escapes from them will be trapped under the towel and will keep all the tortillas wonderfully soft and flexible.
Fun Fact
Although wheat tortillas are associated with Mexico, their history is closely linked to the arrival of the Spaniards in the New World. Indigenous people had been baking cornmeal cakes (masa harina) for thousands of years. Wheat was brought by the conquistadors, and wheat tortillas became popular mainly in the northern regions of Mexico.
Best for
Tips
Serve the tortillas warm. They are an ideal base for wraps with grilled chicken, pulled beef, fresh vegetables (romaine lettuce, tomatoes, avocado, red onion), and yogurt-based sauces, guacamole, or salsa. You can also cut them into triangles, brush with oil, sprinkle with spices, and bake in the oven to create homemade nachos.
Completely cooled tortillas should be stored in a tightly sealed ziplock bag or container. At room temperature, they will stay fresh for up to 2 days, and in the refrigerator for up to 5 days. Before using, reheat them in a dry skillet (for 15 seconds on each side) or wrapped in a damp paper towel in the microwave to restore their full flexibility.
📸 Ugotowane przez społeczność
Zaloguj się, aby dodać zdjęcieDodaj zdjęcie gotowej potrawy
Po zatwierdzeniu przez moderatora otrzymasz 10 punktów doświadczenia.
Nikt jeszcze nie dodał zdjęcia. Bądź pierwszy!
Comments (0)
Be the first to comment on this recipe!
Add a comment