
Rub the bacon with salt and sugar, leave it in the fridge to marinate overnight.
Description
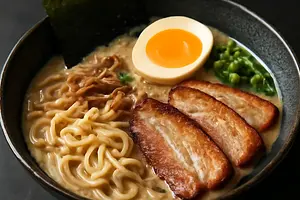
Classic Japanese ramen with aromatic miso broth and melt-in-your-mouth chashu pork. The rich umami flavor comes from miso paste, dashi, and tare. Smooth ramen noodles perfectly complement soft ajitsuke tamago eggs, crunchy bamboo shoots, and fresh chives. This dish is warming and hearty, winning the hearts of Japanese cuisine lovers around the world. A perfect combination of tradition and flavor.
Ingredients (10)
Servings:
4
- Ramen noodles 400 g
- Pork bacon 500 g
- Miso pasta 80 ml
- Soy sauce 60 ml
- Egg 0.1 szt.
- ✨ Opcjonalne
- Ginger 30 g
- Bamboo shoots 100 g
- Nori algae 4 g
- Garlic 0.8 ząbek
- Chives 0.0 pęczków
💰 Szacowany koszt dania:
~54.82 PLN
(13.71 PLN/porcję)
💡 Kliknij na składnik aby oznaczyć jako użyty
Preparation steps
1
2
The next day, roll the bacon into a cylinder, tie it with string, and simmer for 3 hours in soy sauce with sake.
3
We prepare the broth: we boil pork bones for 6 hours, adding ginger and garlic.
4
We boil the eggs soft (6 minutes), peel them, and marinate in soy sauce.
5
Add the miso paste to the broth and stir until dissolved.
6
Cook the ramen noodles according to the instructions on the package.
7
We place the pasta in bowls and pour miso broth over it.
8
We decorate with slices of chashu, halved eggs, bamboo shoots, and nori.
Fun Fact
Ramen has its roots in China, but it has become one of the most popular dishes in Japan, where many regional variations have emerged.
Best for
Tips
🍽️
Serving
Serve the ramen in deep bowls to properly hold the broth. Garnish the dish with fresh chives and nori seaweed, and serve chopsticks and a soup spoon on the side. It tastes best when hot.
🥡
Storage
Store leftover ramen in airtight containers in the fridge for up to 3 days. You can freeze the broth and chashu, but it's best to consume the noodles fresh. Reheat in a pot over low heat, adding a little water so the broth doesn't become too thick.
📸 Ugotowane przez społeczność
Zaloguj się, aby dodać zdjęcieDodaj zdjęcie gotowej potrawy
Po zatwierdzeniu przez moderatora otrzymasz 10 punktów doświadczenia.
🍲
Nikt jeszcze nie dodał zdjęcia. Bądź pierwszy!


Comments (0)
Be the first to comment on this recipe!
Add a comment