Rustic Walnut-Buckwheat Bread with a Hint of Chestnut

Cakes and Bakes Vegetarian Dishes Breakfasts 240 min Medium 12 wyświetleń ~20.17 PLN - (0)
Rate:
(0)
Start Cooking

Description

Discover the magic of homemade bread with this unique recipe for a loaf that combines three extraordinary flours: spelt, buckwheat, and chestnut. This is not just an ordinary loaf – it’s a journey into a world of deep, earthy flavors and aromas. Spelt flour gives it a light sweetness and delicacy, buckwheat introduces a distinctive, slightly nutty note and a beautiful, darker color, while a touch of chestnut flour adds subtle sweetness and an exceptional aroma that will fill your kitchen while baking. The bread has a moist, dense, yet pleasantly springy crumb, dotted with crunchy walnuts and flaxseeds. Its crust is wonderfully crispy and rustic. It pairs perfectly with butter, honey, a cheese board, vegetable spreads, or as an accompaniment to hearty soups and stews. This is a suggestion for those who appreciate healthy, wholesome bread with a unique character.

Ingredients (9)

Servings:
12
  • Light spelt flour (type 630 or 700) 350 g
  • Buckwheat flour 100 g
  • chestnut flour 50 g
  • Active rye sourdough 100 g
  • Water 380 ml
  • wildflower honey 20 g
  • 🌿 Przyprawy
  • Kłodawa uniodized salt 2 łyżeczki
  • ✨ Opcjonalne
  • Walnuts 80 g
  • Flaxseed 30 g
💰 Szacowany koszt dania: ~20.17 PLN (1.68 PLN/porcję)

💡 Kliknij na składnik aby oznaczyć jako użyty

Preparation steps

Autolyse - Preliminary Hydration of Flour

1

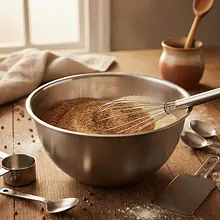
In a large bowl, combine all three types of flour: spelt, buckwheat, and chestnut. Use a whisk or spoon to mix and aerate them well. Then pour in 350g of warm water (leaving 30g for later). Stir with a large spoon or your hand just until all the flour is wet and there are no dry clumps. Do not knead the dough! Cover the bowl with plastic wrap or a damp cloth and set aside for 30-60 minutes at room temperature. This process is called autolyse - it allows the flour to absorb the water, making later kneading easier and developing the gluten.

Ingredients: 
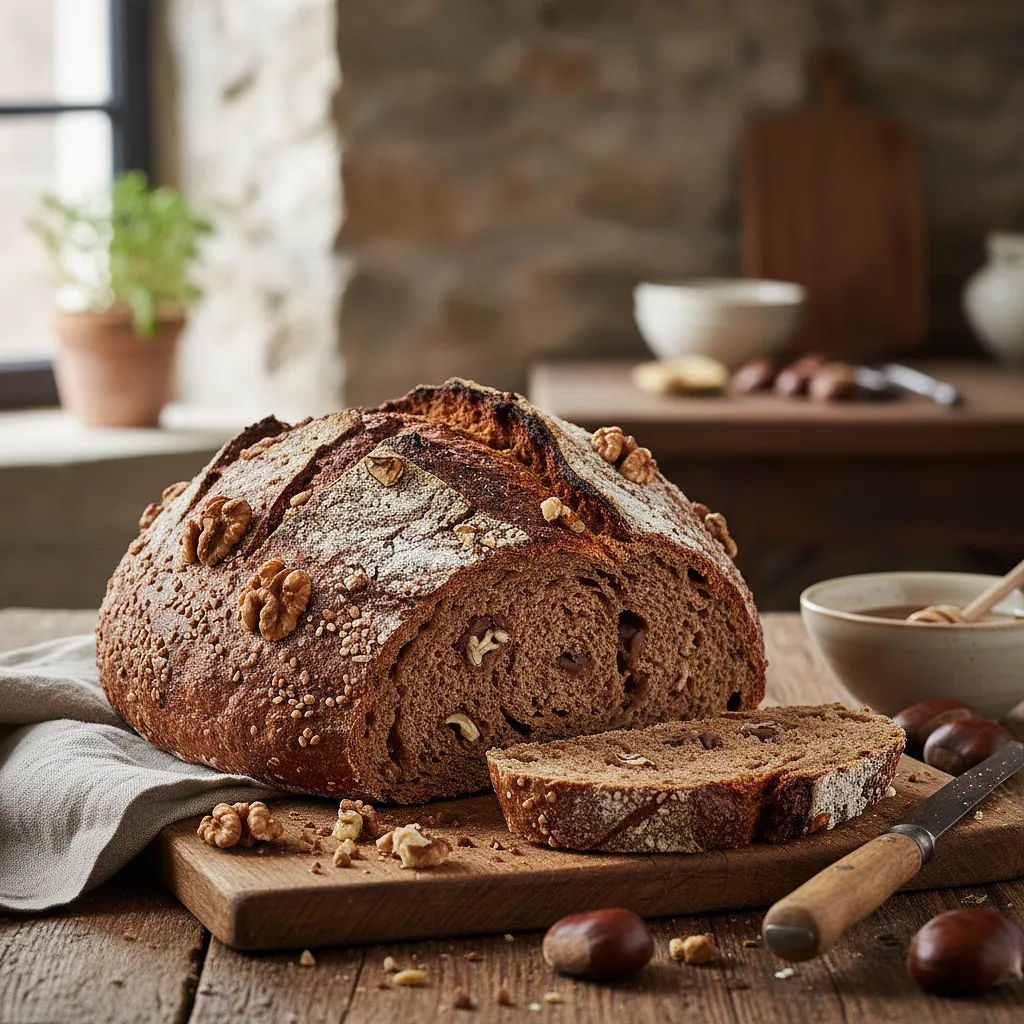
Light spelt flour (type 630 or 700), Buckwheat flour, chestnut flour, Water
Use a large bowl, preferably glass or plastic, to have enough space for the rising dough. Don't worry if the dough is sticky and uneven at this stage - that's normal. Autolyse is a key, though often overlooked, step in achieving good bread structure.

Kneading the Dough

2

After the autolyse, add 100g of active sourdough and 20g of honey to the bowl. Using your hand, gently knead the sourdough into the dough, making 'pinching' and folding motions until the ingredients are initially combined. Let it rest for 20 minutes. Then add 10g of salt and the remaining 30g of water. Start kneading the dough in the bowl again. Grab the edge of the dough, stretch it up, and fold it into the center. Rotate the bowl and repeat this motion for about 5 minutes, until the salt and water are absorbed and the dough becomes more cohesive and smooth.

Ingredients: Active rye sourdough, wildflower honey, Kłodawa uniodized salt, Water
The dough will be quite loose and sticky due to the buckwheat flour. Do not add more flour! Work with wet hands to prevent the dough from sticking to your fingers. The 'stretch and fold' technique is better for wet doughs than traditional kneading.
3

If you are using add-ins, now is the time to add them. Flatten the dough slightly at the bottom of the bowl, evenly sprinkle with walnuts and flaxseeds. Again, use the folding technique to evenly distribute the add-ins throughout the dough. Make a few folds until the nuts and seeds are visible throughout the mixture.

Ingredients: Walnuts, Flaxseed
You can chop the nuts lightly beforehand if you prefer smaller pieces in the bread. The additions can be omitted; the bread will still be delicious.

Pre-Fermentation (Bulk Fermentation)

4

Transfer the dough to a clean, lightly oiled bowl or a container with a lid. Leave the dough in a warm place (about 24-26°C) for 3-4 hours. During this time, every 45 minutes, perform a series of 'folds'. Wet your hands with water, grab one edge of the dough, gently stretch it upwards and fold it into the center. Rotate the bowl 90 degrees and repeat from each of the four sides. After each series of folds, cover the bowl. You will see how the dough becomes stronger, smoother, and more aerated with each passing hour.

Use a transparent container so you can observe the dough rising and the air bubbles forming from the bottom and sides. Fermentation is complete when the dough has increased in volume by about 30-50% and is elastic.

Shaping the Loaf

5

Gently turn the dough out of the bowl onto a lightly floured surface, trying not to 'de-gas' it too much. Shape the dough into a ball by tucking its edges underneath. Cover with a cloth and let it rest on the counter for 20-30 minutes (this is called 'bench rest'). After this time, finally shape the loaf. Flatten the ball into a rectangle, then roll it up tightly like a log to create an elongated loaf, or reshape it into a nice ball again. It is important to create tension on the surface of the dough.

Use as little flour as possible for shaping to avoid drying out the dough. You can use a bench scraper to help with folding the edges and building tension in the loaf.

Final Proof

6

Prepare a proofing basket (banneton) or a regular bowl (about 20 cm in diameter) lined with a clean kitchen towel. Generously dust the basket or towel with rice flour or potato flour (not wheat flour, as it will stick). Transfer the shaped loaf to the basket seam side up. Cover with a plastic bag or cling film and place in the refrigerator for 12-16 hours (long, cold proofing).

A long fermentation in the fridge develops a deeper, more complex flavor in the bread and makes it easier to score later. If you don't have time, you can leave the bread to rise at room temperature for 2-3 hours, until it visibly increases in size.

Baking

7

An hour before baking, place a covered cast iron pot in the oven and preheat it to 240°C. When the oven and pot are hot, carefully remove the hot pot. Take the dough out of the fridge and transfer it onto a piece of parchment paper. With a sharp knife or razor blade, make one deep (about 1 cm) cut along the top of the loaf or several smaller cuts. Grabbing the paper, carefully transfer the loaf into the hot pot.

Be careful, the pot is extremely hot! Use thick oven mitts. The slit allows the bread to control how it cracks and rises in the oven ('oven spring').
8

Cover the pot with a lid, place it in the oven, and bake for 20 minutes. After this time, carefully remove the lid (watch out for the hot steam!) and reduce the temperature to 210°C. Continue baking uncovered for another 20-25 minutes, until the bread has a deep, dark brown color and the crust is hard. When tapped on the bottom, it should make a hollow sound.

Baking covered creates steam, which allows the bread to rise maximally and forms a crispy crust. Baking uncovered allows the crust to brown and dry out.

Cooling

9

Immediately after removing from the oven, transfer the bread from the pot to a metal rack. Leave it to cool completely, for at least 2-3 hours, preferably longer. This is an absolutely crucial step! Slicing hot bread will result in a gummy and undercooked crumb, as the 'cooking' process inside is still ongoing.

I know the smell is tempting, but be patient! Proper cooling on a rack allows air to flow from all sides and ensures that the crust stays crispy while the interior reaches the perfect texture.

Fun Fact

💡

Spelt, one of the main flours in this bread, is one of the oldest grains cultivated by humans. Its traces have been found in the Middle East dating back over 7000 years! It was a staple in the diet of Roman gladiators, who believed it gave them strength and endurance.

Best for

Tips

🍽️ Serving

This bread is so aromatic that it tastes best on its own, with a bit of high-quality butter and a pinch of sea salt. It pairs perfectly with strong-flavored cheeses (e.g., goat, blue), homemade jams, avocado spread, or as a base for sandwiches with smoked salmon and dill.

🥡 Storage

To keep the crust crispy, store the bread in a linen or cotton bag at room temperature for 3-4 days. Avoid plastic bags, which make the crust rubbery. The bread can also be sliced and frozen, then individual slices can be thawed in a toaster.

📸 Ugotowane przez społeczność

Zaloguj się, aby dodać zdjęcie
Dodaj zdjęcie gotowej potrawy

Po zatwierdzeniu przez moderatora otrzymasz 10 punktów doświadczenia.

🍲

Nikt jeszcze nie dodał zdjęcia. Bądź pierwszy!

Comments (0)

Be the first to comment on this recipe!

Add a comment

You might also like

Recipe Categories

Homemade cakes and pastries are the heart of Polish culinary tradition - sweet memories from childhood. In our collection, you will find recipes for classic yeast cakes, shortcrust, sponge, and cheesecake. Apple pie, poppy seed cake, gingerbread, Easter babka, chocolate cake, and New York cheesec...

See all recipes in this category

Vegetarian cuisine is a wealth of flavors without meat - healthy, colorful, and filling. Plant-based proteins: lentils, chickpeas, beans, peas, and soy take center stage. Cheeses and dairy: feta, halloumi, ricotta, and mascarpone in main dishes. Eggs in various forms: omelets, frittata, shakshuka...

See all recipes in this category

Breakfast is the most important meal of the day - energy for a good start and a tasty morning. Scrambled eggs, fried eggs, poached eggs, and omelets - protein classics. Oatmeal with fruits, nuts, and honey - a healthy and filling fit breakfast. American pancakes and French crepes - a sweet start ...

See all recipes in this category
Additions
Additions in: Christmas Eve Dinner

Side dishes complement main courses and influence the overall meal experience. In this category, we present recipes for potatoes, grains, rice, dumplings, and salads. Our dishes include classic Polish sides - kopytka, Silesian dumplings, mashed potatoes. You will also find modern alternatives - q...

See all recipes in this category
Reklama