Instant Dry Ice Vanilla-Caramel Ice Cream

Wegetariańskie Desserts Dishes for Special Occasions For Kids 30 min Medium 10 wyświetleń ~30.78 PLN - (0)
Rate:
(0)
Start Cooking

Description

Discover the culinary and scientific magic of creating the smoothest, creamiest ice cream you've ever tasted, all in just a few minutes! This recipe is your ticket to the world of molecular gastronomy in the comfort of your home, without the need to invest in expensive equipment. We will use dry ice (that is, solid carbon dioxide) to instantly freeze a rich, vanilla egg base. The extremely low temperature of dry ice (-78.5°C) prevents large ice crystals from forming in the ice cream mixture, which are the bane of homemade ice cream. Instead, microcrystals are created, giving an incredible, velvety smoothness that cannot be achieved with a traditional ice cream maker. The visual effect of thick, white "fog" swirling during preparation will amaze everyone, and the taste of freshly made, intensely vanilla ice cream with caramel sauce is simply unforgettable. It’s the perfect dessert for special occasions, children's parties (under strict adult supervision!), or just as a way to impress your guests.

Ingredients (9)

Servings:
4
  • 36% heavy cream 250 ml
  • Whole milk 3.2% 250 ml
  • Żółtko jaja kurzego 4 szt.
  • Cukier biały drobny 150 g
  • Vanilla extract 2 łyżeczki
  • Dry ice (in granules or block) 500 g
  • 🌿 Przyprawy
  • Sól drobnoziarnista 0.2 łyżeczek
  • ✨ Opcjonalne
  • Caramel sauce 60 g
  • Crushed butter cookies 50 g
💰 Szacowany koszt dania: ~30.78 PLN (7.69 PLN/porcję)

💡 Kliknij na składnik aby oznaczyć jako użyty

Preparation steps

Preparation of Ice Base

1

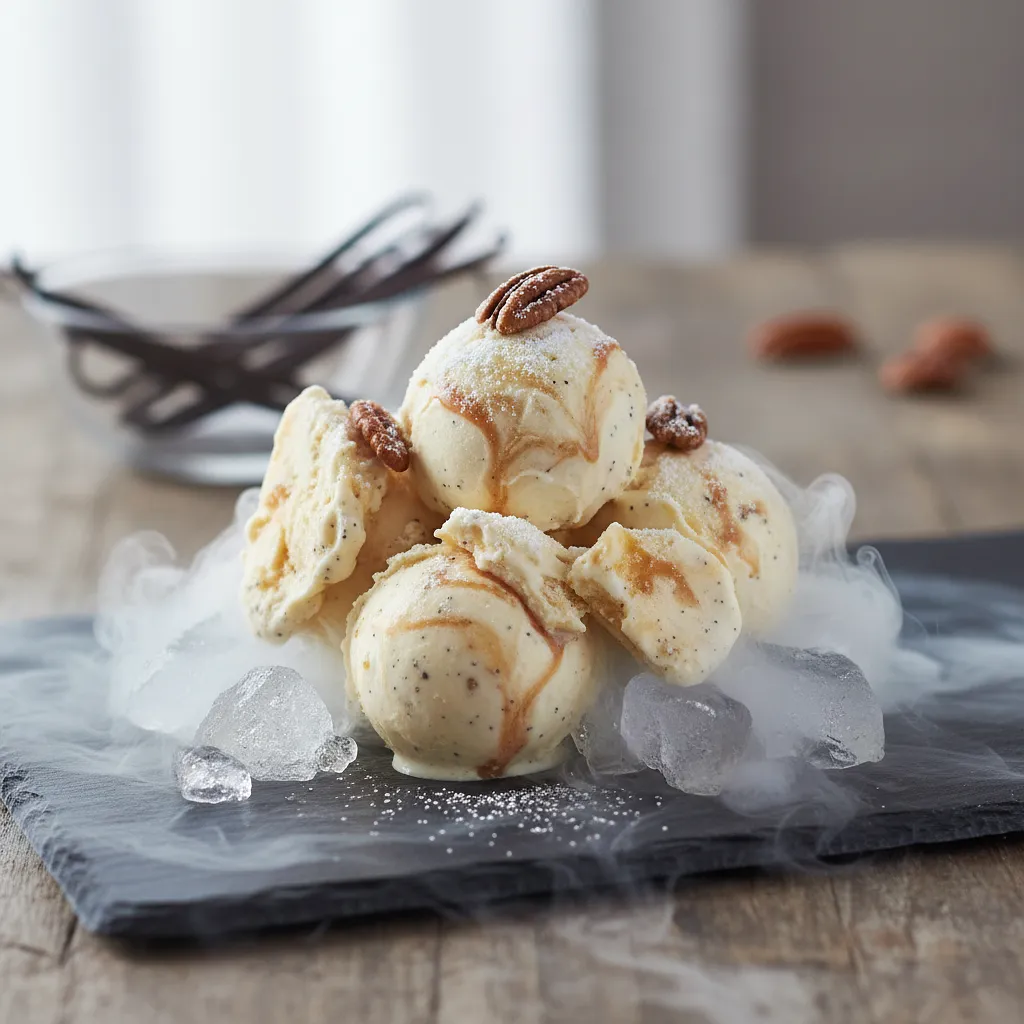
Start by preparing the base, which is the heart of our ice cream. In a medium-sized bowl (preferably metal or glass), place the egg yolks and sugar. Using a whisk or a hand mixer on low speed, beat the ingredients for about 2-3 minutes. The goal is to achieve a light, fluffy, and smooth mixture, known as zabaglione. The sugar should completely dissolve, and the mixture should double in volume and take on a pale, creamy color. When you run your finger along the bottom of the bowl, you shouldn't feel any sugar crystals.

Ingredients: Żółtko jaja kurzego, Cukier biały drobny
Use a bowl large enough to mix freely without splashing. Thoroughly whisking the egg yolks with the sugar is crucial to ensure the ice cream doesn't have a grainy texture. Don't rush this step.
2

In a medium saucepan with a thick bottom, combine the heavy cream and milk. Heat over medium heat, stirring occasionally with a wooden spoon to prevent the liquid from burning. Bring the mixture to the point where small bubbles begin to form at the edges of the pot and steam rises from the surface. The liquid should be very hot, but do not let it boil! Boiling could curdle the yolks in the next step.

Ingredients: 36% heavy cream, Whole milk 3.2%
A pot with a thick bottom is important because it distributes heat evenly and prevents the milk from burning. Remove the pot from the heat as soon as you notice the first signs of boiling.
3

Now the most important moment: tempering the yolks. This is the process of slowly raising their temperature so they don't curdle. With one hand, very slowly pour the hot mixture of milk and cream into the bowl with the beaten yolks in a thin stream. With the other hand, continuously and vigorously whisk the yolk mixture. Start by pouring in about 1/3 of the hot liquid. Once the ingredients are combined, you can pour in the rest of the liquid, still mixing all the while. This way, the yolks gradually acclimate to the high temperature.

This is a key step! If you pour in the hot liquid too quickly or without stirring, you'll end up with scrambled eggs. Patience is your best friend here. Use a ladle to add the liquid in portions if that makes it easier for you.
4

Pour the entire combined mixture back into the saucepan. Place it over low heat and warm it, stirring constantly with a wooden spoon or silicone spatula, scraping the mixture from the bottom and sides of the pot. Cook for about 5-8 minutes, until the mixture thickens noticeably and reaches the consistency of a thin pudding. You will know it's the right moment when the mixture coats the back of the spoon, and when you run your finger through it, a clean trail remains. Do not let it boil!

Use a silicone spatula to thoroughly scrape the mixture from the bottom, which prevents it from sticking and burning. If small lumps happen to appear, don't panic – you can strain the finished base through a fine sieve.
5

Remove the saucepan from the heat. Stir in the vanilla extract and a pinch of salt into the hot mixture. The salt will enhance the flavor and balance the sweetness. Next, the mixture should be cooled as quickly as possible. Pour it through a fine sieve into a clean bowl to catch any lumps. Place the bowl in a larger container filled with cold water and ice (a so-called ice bath) and stir occasionally until the mixture reaches room temperature. Then cover the bowl with plastic wrap (so that it touches the surface of the liquid to prevent a skin from forming) and refrigerate for at least 1-2 hours, or preferably until completely chilled.

Ingredients: Vanilla extract, Sól drobnoziarnista
Quickly cooling the base is important for food safety reasons. A cold base will also turn into ice cream much faster. Don't skip this step!

Freezing with Dry Ice

6

SAFETY FIRST! Dry ice has a temperature of -78.5°C and can cause serious frostbite upon contact with skin. Wear thick protective gloves (e.g., leather or ski gloves) and safety goggles. Work in a well-ventilated area, as dry ice sublimates into carbon dioxide, which can be harmful in high concentrations. If you have a block of dry ice, place it in a strong, clean fabric bag or wrap it in a thick towel and hit it with a hammer or rolling pin until you crush it into a fine powder. It's also a good idea to further break down the pellets.

Ingredients: Dry ice (in granules or block)
NEVER touch dry ice with bare hands! Ensure air circulation by opening a window. Do not store dry ice in a tightly sealed container, as the increasing gas pressure can cause an explosion.
7

Take the chilled ice base out of the fridge and pour it into the bowl of a stand mixer fitted with a whisk attachment. If you don't have a stand mixer, you can use a large metal bowl and a hand mixer. Start the mixer on low speed. Wearing protective gloves, use a spoon to gradually add the powdered dry ice to the ice base, one tablespoon at a time. After each addition, mix until the "fog" (carbon dioxide gas) settles a bit.

A metal mixing bowl will work best, as it withstands low temperatures well. Add dry ice slowly – adding too much at once can cause a sudden "overflow" of fog and mixture from the bowl.
8

Continue adding dry ice and mixing. You will see a spectacular effect - thick clouds of white mist will rise from the bowl. The mixture in the bowl will start to thicken very quickly. Scrape the mixture from the sides of the bowl occasionally with a silicone spatula. Continue adding the powder until the ice cream reaches the desired thick and creamy consistency, typical of soft-serve ice cream or slightly firmer. The entire process should take no more than 5-7 minutes. You will not use all of the dry ice.

When the ice cream thickens, try a small spoonful. If you feel a slight "fizz" on your tongue, it means there is still some unsublimated carbon dioxide in the ice cream. Wait a minute or two, stirring until the effect disappears.

Serving

9

Your quick ice cream is ready! Immediately transfer it to chilled bowls or cups. Serve right away while it has the perfect, velvety consistency. Optionally, before serving, drizzle the ice cream with caramel sauce, creating appetizing swirls. Top with crushed butter cookies for added crunch. Enjoy!

Ingredients: Caramel sauce, Crushed butter cookies
Chilling the bowls in the freezer for 15 minutes before serving will make the ice cream melt more slowly. Be creative with toppings - fresh fruits, whipped cream, or grated chocolate also work great.

Fun Fact

💡

The freezing method using ultra-low temperatures, such as those from liquid nitrogen or dry ice, is called "cryogenic cooking." It causes water in the product to freeze so quickly that large, sharp ice crystals do not form, which would damage the cell structure and spoil the texture. That’s why nitrogen ice creams are incomparably smoother than traditional ones.

Best for

Tips

🍽️ Serving

Ice cream made using this method is best enjoyed right after it's made. Its texture is then the most velvety. Serve in small portions so that guests can fully appreciate its exceptional quality. You can also mix in add-ins, such as chocolate pieces or fruit, at the very end of blending.

🥡 Storage

If you have leftover ice cream, you can store it in the freezer in an airtight container. However, keep in mind that after freezing in a traditional freezer, it will become very hard, as it does not contain commercial stabilizers. To serve it again, take the container out of the freezer about 15-20 minutes before serving to let it soften a bit.

📸 Ugotowane przez społeczność

Zaloguj się, aby dodać zdjęcie
Dodaj zdjęcie gotowej potrawy

Po zatwierdzeniu przez moderatora otrzymasz 10 punktów doświadczenia.

🍲

Nikt jeszcze nie dodał zdjęcia. Bądź pierwszy!

Comments (0)

Be the first to comment on this recipe!

Add a comment

You might also like

Recipe Categories

Desserts
Desserts in: New Year's Eve

A sweet ending to the New Year's Eve dinner is a must-have that will put everyone in a joyful mood for the new year.

See all recipes in this category

Dishes for special occasions are culinary masterpieces for birthdays, anniversaries, and holidays. Grilled beef steak with herb butter - restaurant quality at home. Beef Wellington - beef in puff pastry with duxelles. Roast duck with apples - a holiday tradition in a new edition. Pink salmon with...

See all recipes in this category

Recipes for kids are tasty, healthy, and visually appealing dishes - for little picky eaters and food lovers. Colorful and fun dishes: animals made from vegetables, faces from food, and rainbow plates. Hidden vegetables: spinach in pancakes, carrots in sauce, and zucchini in batter. Energetic bre...

See all recipes in this category
Snacks
Snacks in: New Year's Eve

Snacks are the perfect way to make the wait for midnight more enjoyable; they should be small but impressive.

See all recipes in this category
Reklama