Rainbow Pumpkin Gnocchi with Sage Butter and Crunchy Nuts

Kids' Lunches Vegetarian Dishes Italian Cuisine 120 min Medium 36 wyświetleń ~25.76 PLN - (0)
Rate:
(0)
Start Cooking

Description

This dish is a culinary story and an invitation to a shared family fun in the kitchen, perfectly fitting the Slow Food philosophy. Rainbow pumpkin gnocchi is not only a delicious and healthy meal but, above all, a way to show children how magic is created on the plate from simple, natural ingredients. Sweet, velvety pumpkin forms the base for delicate, fluffy dumplings, and the addition of natural colorants – spinach and beet juice – turns cooking into an art lesson. Children will joyfully knead and shape the colorful dough. The whole dish is enveloped in an aromatic sauce of browned butter with crispy sage leaves, which adds depth and a nutty flavor to the dish. A sprinkle of toasted walnuts adds a pleasant crunch, while parmesan flakes balance the sweetness with umami flavor. This dish teaches patience, the celebration of meals, and shows that healthy eating can be an exciting adventure.

Ingredients (11)

Servings:
4
  • Hokkaido pumpkin 1000 g
  • Type 00 wheat flour 250 g
  • Egg 1 szt.
  • Butter 80 g
  • Fresh sage 0.5 pęczek
  • Parmesan 40 g
  • 🌿 Przyprawy
  • Salt 0.2 szczypt
  • Nutmeg 2 szczypty
  • ✨ Opcjonalne
  • Walnuts 50 g
  • Spinach juice 15 ml
  • Sok z buraka 15 ml
💰 Szacowany koszt dania: ~25.76 PLN (6.44 PLN/porcję)

💡 Kliknij na składnik aby oznaczyć jako użyty

Preparation steps

Preparation of Pumpkin Purée

1

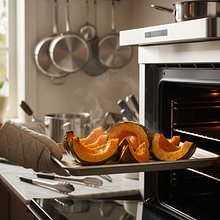
Preheat the oven to 200°C (fan) or 220°C (top and bottom). Thoroughly wash the pumpkin, then carefully cut it in half. Use a large, sharp spoon to scoop out the seeds and fibers. Place the pumpkin halves on a large baking sheet lined with parchment paper, skin side up. Put them in the preheated oven and bake for about 30-40 minutes. The pumpkin is ready when a fork easily pierces the flesh and the skin is slightly wrinkled.

Ingredients: Hokkaido pumpkin
Use a stable cutting board to prevent the pumpkin from slipping. You can wash, dry, and roast the pumpkin seeds with salt – it's a delicious, healthy snack! Don't shorten the baking time; well-baked pumpkin has more flavor and is less watery.
2

Remove the pumpkin from the oven and set it aside for about 15-20 minutes to cool slightly so that it can be safely handled. When the pumpkin is still warm but not hot, use a spoon to separate the flesh from the skin (the skin of hokkaido pumpkin is edible, but for purée, it's better to use just the flesh for a smoother consistency). Transfer the flesh to a bowl and mash it very thoroughly with a potato masher or blend it with an immersion blender until you have a smooth, uniform mixture. Set the purée aside to cool completely – this is very important, as hot purée will 'scald' the flour and the dough will be sticky.

Ingredients: Hokkaido pumpkin
If the purée seems very wet, you can evaporate it. Transfer it to a dry pan and heat over low heat for a few minutes, stirring constantly, until it thickens. The less water in the purée, the less flour you will need, and the gnocchi will be more delicate.

Kneading Rainbow Dough for Gnocchi

3

On a clean, dry surface or countertop, pile 200g of flour to form a mound. In the center of the mound, create a wide indentation with your fingers, resembling a volcano crater. Into this indentation, add the cooled pumpkin purée (about 450-500g), crack in an egg, add half a teaspoon of salt, and a pinch of freshly grated nutmeg.

Ingredients: Type 00 wheat flour, Egg, Salt, Nutmeg
Work on a large wooden board or a clean kitchen countertop. Leaving some flour for later will allow you to control the consistency of the dough – it’s always easier to add flour than water.
4

Using a fork, start gently mixing the wet ingredients in the center of the 'volcano'. Gradually, in a circular motion, incorporate the flour from the inner walls into the center until a thick, sticky mass forms. Once most of the flour is combined with the ingredients, set the fork aside and begin kneading the dough with your hands.

Ingredients: Type 00 wheat flour, Egg
This is the perfect moment to involve the kids! Mixing with a fork is a safe and fun step. Don't worry if the dough is very sticky at first – that's normal.
5

Knead the dough for about 5-7 minutes, adding the remaining flour if necessary. Use the 'pushing and folding' technique: push the dough away from you with the heel of your hand, then fold it in half and turn it 90 degrees. Repeat this motion. The dough is ready when it is smooth, elastic, and only slightly sticky to the hands. It should be soft like the lobe of an ear. Shape it into a ball.

Ingredients: Type 00 wheat flour
The key is not to add too much flour! The more flour you add, the firmer the gnocchi will be. The pumpkin dough will always be a bit sticky. If it sticks heavily to your hands, dust your hands with flour, not the dough.
6

Divide the ball of dough into three equal parts. Set one part aside. To the second part, add a tablespoon of spinach juice, and to the third part, a tablespoon of beet juice. Now comes the fun part for the kids: knead each of the colored portions separately until the dye is evenly distributed and you have three smooth balls of dough: orange, green, and pink. If necessary, sprinkle with a little flour. Cover the balls of dough with a clean cloth and let them rest for 10 minutes.

Ingredients: Spinach juice, Sok z buraka
The food coloring will make the dough temporarily wetter. Don't panic, just knead it patiently until it absorbs the liquid. You can use gloves to avoid staining your hands, but for kids, getting messy is part of the fun!

Shaping the Gnocchi

7

Take one ball of dough (e.g. orange) and on a lightly floured surface, shape it into a log. Gently roll it with your hands, from the center outwards, until you get a long 'snake' about 2 cm thick (the thickness of your thumb). If the log becomes too long and difficult to handle, cut it in half and roll each part separately.

Ingredients: Type 00 wheat flour
Try to ensure that the rolling pin has an even thickness along its entire length. This way, all the gnocchi will be of similar size and will cook at the same time. This exercise greatly develops fine motor skills in children.
8

Using a knife or dough scraper, cut the roll into small pieces about 2-2.5 cm long, creating small 'pillows'. Place the cut gnocchi on a tray or board generously sprinkled with flour, ensuring they do not touch each other. Repeat the rolling and cutting process for the remaining colors of dough.

Use the blunt side of a knife or a plastic knife if small children are helping with cutting. Dusting the tray with flour is crucial; otherwise, the gnocchi will stick and lose their shape.
9

Now we will give the gnocchi their characteristic shape. Take a fork and place it tines down on the countertop. Take each 'pillow' of dough in your fingers and gently slide it over the tines of the fork, pressing lightly with your thumb. The dough should roll, and grooves will form on its surface. Place the finished gnocchi back on the floured tray.

This step is optional, but highly recommended! The grooves help the sauce stick better to the dumplings. You can also use a special wooden gnocchi board. It's a lot of fun and a great precision exercise.

Cooking Gnocchi and Preparing the Sauce

10

In a large pot, bring at least 4 liters of water to a boil. When the water starts to boil, add a generous tablespoon of salt (about 10g). Carefully drop the gnocchi into the boiling water in batches (not all at once, to avoid lowering the water temperature). Gently stir with a wooden spoon to prevent them from sticking to the bottom. The gnocchi are ready when they float to the surface – this usually takes about 2-3 minutes from the moment the water comes back to a boil. Remove them with a slotted spoon.

Ingredients: Salt
Use the largest pot you have. Gnocchi need plenty of space to swim freely. Cooking in batches is very important – if you throw in too many at once, they will stick together and be undercooked.
11

While the first batch of gnocchi is cooking, prepare the sauce. In a large skillet over medium heat, melt the butter. When it starts to foam, add whole sage leaves. Fry, gently shaking the skillet, for about 2-3 minutes. Watch the butter carefully: it will first become clear, then brown specks will appear at the bottom, and the butter will take on an amber color and start to smell nutty. The sage should become crispy. Immediately remove the skillet from the heat to prevent the butter from burning.

Ingredients: Butter, Fresh sage
Brown butter, or 'beurre noisette', is a technique that requires attention. The difference between perfectly nutty and burnt butter is a matter of seconds! As soon as you smell the nutty aroma and see the amber color, remove the pan from the heat.
12

If you are using nuts, chop them coarsely. You can add them to the sage butter during the last 30 seconds of cooking to warm them up and release their aroma, or toast them separately in a dry pan until they become fragrant.

Ingredients: Walnuts
Toasting nuts in a dry pan gives you more control and prevents them from becoming soggy in butter. Toast over medium heat, stirring frequently, until they become lightly golden.

Serving the Dish

13

Cooked gnocchi, scooped out with a slotted spoon, transfer directly from the pot to the pan with hot sage butter. Gently toss or stir to coat each dumpling in the sauce. Leave in the pan for a minute to let the flavors meld.

Transferring the gnocchi directly from the water to the sauce helps create an emulsion, as a bit of the cooking water thickens the sauce. Act quickly to ensure the gnocchi are hot when serving.
14

Immediately plate the gnocchi. Drizzle with the remaining butter from the pan, making sure each serving has crispy sage leaves. Sprinkle with toasted walnuts (if using) and generously dust with freshly grated Parmesan. Serve right away while hot.

Ingredients: Walnuts, Parmesan
For grating the parmesan, use a fine grater or a vegetable peeler to achieve beautiful, thin flakes. The dish tastes best right after preparation.

Fun Fact

💡

The word 'gnocchi' in Italian means 'lumps' or 'knots', referring to their shape. Although they are associated with potatoes, the oldest versions of gnocchi were made from flour, breadcrumbs, or semolina, and the addition of vegetables such as pumpkin is a tradition in the poorer regions of northern Italy, where pumpkin was readily available.

Best for

Tips

🍽️ Serving

Serve the gnocchi immediately after preparation as a main dish. They pair wonderfully with a simple arugula salad, cherry tomatoes, and a light vinaigrette, which will balance the richness of the buttery sauce. For adults, a glass of light white wine, such as Pinot Grigio, complements the dish well.

🥡 Storage

Gnocchi taste best when fresh. If you want to prepare them in advance, arrange the formed, raw dumplings on a tray dusted with flour and freeze. Once frozen, transfer them to a ziplock bag. Cook the frozen ones by dropping them straight into boiling water (they will need 1-2 minutes longer). Cooked gnocchi can be stored in the refrigerator for up to 2 days and reheated in a pan with a bit of butter.

📸 Ugotowane przez społeczność

Zaloguj się, aby dodać zdjęcie
Dodaj zdjęcie gotowej potrawy

Po zatwierdzeniu przez moderatora otrzymasz 10 punktów doświadczenia.

🍲

Nikt jeszcze nie dodał zdjęcia. Bądź pierwszy!

Comments (0)

Be the first to comment on this recipe!

Add a comment

You might also like

Recipe Categories

Kids' Lunches
Kids' Lunches in: For Kids

Meals for children are tasty dishes in appropriate portions - healthy and visually appealing. Meatballs in tomato sauce with pasta - a classic loved by kids. Chicken patties in a breading with carrots and potatoes. Pasta with cheese - simple and always effective. Tomato soup with letters or stars...

See all recipes in this category

Vegetarian cuisine is a wealth of flavors without meat - healthy, colorful, and filling. Plant-based proteins: lentils, chickpeas, beans, peas, and soy take center stage. Cheeses and dairy: feta, halloumi, ricotta, and mascarpone in main dishes. Eggs in various forms: omelets, frittata, shakshuka...

See all recipes in this category

Italian cuisine is love at first bite - pasta, pizza, and amore on the plate. Pasta in all shapes: spaghetti, penne, rigatoni, tagliatelle, and lasagna with homemade sauces. Italian sauces: bolognese, carbonara, pomodoro, pesto, and aglio e olio - classics. Neapolitan pizza with a crispy crust an...

See all recipes in this category

Dishes for special occasions are culinary masterpieces for birthdays, anniversaries, and holidays. Grilled beef steak with herb butter - restaurant quality at home. Beef Wellington - beef in puff pastry with duxelles. Roast duck with apples - a holiday tradition in a new edition. Pink salmon with...

See all recipes in this category
Reklama