Gluten-free 'Debunking Myths' Rolls with a Crispy Crust

Gluten-free cuisine Cakes and Bakes Breakfasts 135 min Medium 5 wyświetleń ~11.21 PLN - (0)
Rate:
(0)
Start Cooking

Description

Here’s a recipe that once and for all debunks the myth that gluten-free bread has to be hard, dry, and crumbly! These rolls are proof that homemade gluten-free baked goods can be incredibly fluffy on the inside, with a wonderfully crispy and golden crust. Their secret lies in a carefully selected blend of flours and a 'magic' ingredient – psyllium husk, which creates a gel-like structure that perfectly mimics gluten. This makes the dough elastic, and the finished rolls retain moisture and springiness. They have a delicate flavor, with a slight nutty note coming from the rice flour. They are perfect for breakfast, as a base for sandwiches, an addition to soups and salads, or simply as a delicious snack with butter. Preparing them is easier than you think, and the result will surely impress even the biggest skeptics of gluten-free baking.

Ingredients (11)

Servings:
8
  • Whole grain rice flour 200 g
  • Potato starch 150 g
  • Tapioca starch (or tapioca flour) 150 g
  • Psyllium husk 4 łyżki
  • Instant yeast 7 g
  • sugar 15 g
  • Ciepła woda 450 ml
  • Rapeseed oil 30 g
  • 🌿 Przyprawy
  • Salt 0.2 szczypt
  • ✨ Opcjonalne
  • Egg 1 szt.
  • Flaxseed 15 g
💰 Szacowany koszt dania: ~11.21 PLN (1.40 PLN/porcję)

💡 Kliknij na składnik aby oznaczyć jako użyty

Preparation steps

Activation of psyllium gel

1

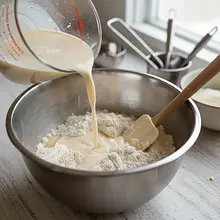
This is the most important step that replaces the action of gluten. Pour 450 ml of warm water into a medium bowl. Add 20 g of psyllium husk and vigorously mix everything with a whisk. Stir for about 30 seconds until all lumps disappear. Set the mixture aside for 5-10 minutes. During this time, the husk will absorb the water and turn into a thick, transparent gel with a consistency similar to jelly. This is our structural base for the rolls.

Ingredients: Psyllium husk, Ciepła woda
Use a whisk, not a spoon – this will prevent lumps from forming. The water must be warm, but not boiling (about 40°C). The properly prepared gel should be smooth and thick enough to hold onto a spoon.

Preparing the dough

2

In a large mixing bowl (or a regular large bowl), place all the dry ingredients: rice flour, potato starch, tapioca starch, instant yeast, sugar, and salt. Using a large whisk or spoon, mix them together very thoroughly for about a minute. It is crucial that the yeast and salt are evenly distributed in the flours, which will ensure the buns rise evenly.

Ingredients: Whole grain rice flour, Potato starch, Tapioca starch (or tapioca flour), Instant yeast, sugar, Salt
It's best to use a stand mixer with a 'hook' or 'flat beater' attachment. If you are kneading by hand, use a sturdy wooden spoon. Do not skip thoroughly mixing the dry ingredients!
3

Add the prepared psyllium gel and canola oil to the bowl with the dry ingredients. Start mixing on low speed until the ingredients are initially combined. Then increase the speed to medium and knead the dough for about 7-8 minutes. Gluten-free dough has a different consistency than wheat dough – it will be very sticky and will resemble a thick paste or mass. That's normal!

Ingredients: Rapeseed oil
A typical mistake: expecting the dough to pull away from the bowl like traditional yeast dough. This dough will remain sticky. Long kneading is important to aerate the mixture well and activate the binding ingredients.

Rising and Shaping

4

After kneading the dough, cover the bowl with a clean kitchen towel or plastic wrap. Set the bowl in a warm, draft-free place for about 45-60 minutes. The ideal temperature is 25-30°C. After this time, the dough should noticeably increase in volume, nearly doubling, and become fluffier and aerated.

A great place for rising is the oven with just the light on or set to 30°C. If the kitchen is cool, you can place the bowl in the sink with warm water.
5

Prepare a baking tray by lining it with parchment paper. Generously grease your hands with oil or dampen them with water – this will prevent the dough from sticking. Remove the risen dough onto a lightly floured rice flour surface (or directly from the bowl) and divide it into 8 equal parts using an oiled scraper or knife. From each part, shape a smooth, round bun, trying to 'tuck' the edges of the dough underneath to keep the top tight and smooth.

Do not knead the dough again! Gently shape it so it doesn't lose all its air. Oiled hands are the best way to work with this sticky dough. Keep space between the rolls on the baking sheet, as they will rise further.

Baking

6

Shape the rolls and place them on a baking sheet, cover loosely with a cloth, and set aside for the second rise for about 30 minutes. During this time, the rolls should become fluffier and increase in volume slightly. Meanwhile, preheat the oven to 200°C (fan) or 220°C (top-bottom). Place a heatproof dish with hot water at the bottom of the oven – the steam will create ideal baking conditions and ensure a crispy crust.

Do not let the rolls rise too long the second time, as they may collapse during baking. 30 minutes is usually the optimal time. Steam in the oven is the secret of professional bakers!
7

Before placing them in the oven, gently brush the tops of the rolls. If you are using optional ingredients, in a small bowl, beat an egg with a fork and brush the rolls with it using a pastry brush. Then sprinkle them with flaxseeds. If you prefer a vegan version, you can brush them with plant-based milk or simply water.

Ingredients: Egg, Flaxseed
Be very gentle when brushing to avoid squashing the risen rolls. A silicone brush is perfect for this. The topping not only adds flavor but also makes the rolls look more appetizing.
8

Place the tray with the rolls in the preheated oven. Bake for about 20-25 minutes. The rolls are ready when their tops are deeply browned and golden-brown. To check if they are baked, you can gently tap the bottom of one of them – it should make a dull, hollow sound.

Every oven bakes differently, so keep an eye on the rolls towards the end of baking. If they brown too quickly, you can loosely cover them with aluminum foil for the last 5 minutes.
9

Remove the baked rolls from the oven and immediately transfer them to a metal cooling rack. Do not leave them on the hot baking sheet, as the bottoms may become damp and soggy from the steam. Allow to cool completely or serve while still slightly warm.

Cooling on a rack is very important for maintaining a crispy crust on all sides. Hot gluten-free bread can be a bit 'chewy' on the inside – it reaches its perfect texture after a slight cooling.

Fun Fact

💡

Psyllium husk, a key ingredient in this recipe, is a true superhero in the gluten-free world. It comes from the seeds of the Plantago ovata plant, primarily grown in India. Its seed husks can absorb water in amounts many times their own weight, creating a gel that perfectly mimics the elastic gluten network that is lacking in gluten-free flours.

Best for

Tips

🍽️ Serving

The rolls taste absolutely delicious while still warm, sliced in half, with melting butter. They are a fantastic base for sandwiches – try them with avocado and tomato spread, hummus and fresh cucumber, or as an addition to morning scrambled eggs. They can also be served with a salad or a bowl of hot soup to soak up the remnants of the delicious sauce.

🥡 Storage

Gluten-free bread tastes best on the day it is baked. To maintain freshness, store the rolls in an airtight container or a zip-lock bag at room temperature for up to 2 days. Before serving, you can refresh them in an oven preheated to 150°C for 5-7 minutes. The rolls freeze very well. After completely cooling, pack them into bags and freeze. Thaw at room temperature or heat in the oven.

📸 Ugotowane przez społeczność

Zaloguj się, aby dodać zdjęcie
Dodaj zdjęcie gotowej potrawy

Po zatwierdzeniu przez moderatora otrzymasz 10 punktów doświadczenia.

🍲

Nikt jeszcze nie dodał zdjęcia. Bądź pierwszy!

Comments (0)

Be the first to comment on this recipe!

Add a comment

You might also like

Recipe Categories

Gluten-free cuisine is the answer to the needs of people with celiac disease and gluten intolerance. Our recipes use flours: rice, corn, buckwheat, almond, and coconut. Gluten-free bread that tastes like traditional - breads, rolls, baguettes, and focaccias. Pasta made from rice, buckwheat, and c...

See all recipes in this category

Homemade cakes and pastries are the heart of Polish culinary tradition - sweet memories from childhood. In our collection, you will find recipes for classic yeast cakes, shortcrust, sponge, and cheesecake. Apple pie, poppy seed cake, gingerbread, Easter babka, chocolate cake, and New York cheesec...

See all recipes in this category

Breakfast is the most important meal of the day - energy for a good start and a tasty morning. Scrambled eggs, fried eggs, poached eggs, and omelets - protein classics. Oatmeal with fruits, nuts, and honey - a healthy and filling fit breakfast. American pancakes and French crepes - a sweet start ...

See all recipes in this category
Reklama