'Tart Perfect Plan' with Seasonal Vegetables

Pikantne Main Dishes Vegetarian Dishes Cakes and Bakes 105 min Medium 10 wyświetleń ~30.01 PLN - (0)
Rate:
(0)
Start Cooking

Description

The 'Perfect Plan' tart is not just a recipe; it's the foundation for flexible meal planning for the entire week. Its essence lies in the buttery, perfectly crumbly crust, which serves as an excellent base for a creamy egg and cream 'royale' filling. The interior of the tart is a canvas on which you can paint with the flavors of seasonal vegetables, leftovers from the fridge, or your favorite cheeses. This recipe teaches how to create a universal base and egg mixture that can be modified at will, inspiring creativity and minimizing food waste. The presented version with spinach, sweet cherry tomatoes, and salty feta is a classic yet sophisticated combination. Visually, the tart delights with its golden edge, a mosaic of colorful toppings, and appetizingly baked cheese. It tastes great both warm, straight from the oven, and cold, making it an excellent option for a work lunch or an elegant dinner.

Ingredients (16)

Servings:
4
  • Mąka pszenna typ 450 lub 500 250 g
  • Butter 125 g
  • Egg 4 szt.
  • Water 30 ml
  • 30% cream 200 ml
  • Aged hard cheese (e.g. gruyère, parmesan) 100 g
  • Fresh spinach 200 g
  • Cherry tomatoes 150 g
  • Feta cheese 100 g
  • Garlic 2 ząbki
  • Extra virgin olive oil 0.1 łyżek
  • 🌿 Przyprawy
  • Salt 6 g
  • Pieprz czarny świeżo mielony 2 szczypty
  • Nutmeg 2 szczypty
  • ✨ Opcjonalne
  • Fresh thyme 0.1 pęczków
  • Sunflower seeds 15 g
💰 Szacowany koszt dania: ~30.01 PLN (7.50 PLN/porcję)

💡 Kliknij na składnik aby oznaczyć jako użyty

Preparation steps

Shortcrust Pastry

1

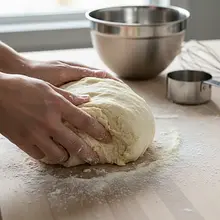
Preparing the dry ingredients. In a large bowl, sift in the flour and salt. Add the very cold butter, cut into small cubes (about 1 cm). The key is that the butter should be as hard as a rock.

Ingredients: Mąka pszenna typ 450 lub 500, Salt, Butter
Sifting the flour through a sieve will aerate it and make the dough lighter. Use a large bowl to have more freedom while working. Cutting the butter into small cubes will make it easier to rub into the flour.
2

Rubbing butter with flour. Using only your fingertips, quickly rub the cubes of butter into the flour until the mixture resembles wet sand or a crumble with visible pea-sized lumps of butter. Work quickly to prevent the butter from warming up from the heat of your hands.

Ingredients: Mąka pszenna typ 450 lub 500, Butter
Do not knead the dough with your hands! The heat from your hands will melt the butter, and the dough will turn out hard instead of crumbly. Alternatively, you can use a pastry cutter or pulse the ingredients in a food processor.
3

Adding wet ingredients. Make a small well in the center of the flour with the butter. Crack one egg into it and pour in the cold water. Using a fork or knife, gently start to incorporate the dry ingredients into the center until larger clumps of dough form.

Ingredients: Egg, Water
Do not pour all the water at once. Start with one tablespoon and add the second only if the dough is too dry. The amount of water depends on the moisture of the flour.
4

Shaping and chilling the dough. Transfer the lumps of dough onto a surface and quickly knead them into a uniform ball – just a few movements are enough to combine the ingredients. Do not knead the dough for too long. Flatten the ball into a disk about 2 cm thick, wrap it tightly in plastic wrap, and place it in the refrigerator for at least 30 minutes, preferably for an hour.

Chilling the dough is key! It allows the butter to firm up, which guarantees flakiness after baking. It also prevents the dough from shrinking during baking.
5

Rolling out and lining the pan. Remove the chilled dough from the refrigerator. On a lightly floured surface, roll out the dough into a round shape about 3-4 mm thick and a few centimeters larger in diameter than your tart pan. Gently roll the dough onto the rolling pin and transfer it over the tart pan (with a diameter of 24-26 cm, preferably with a removable bottom). Unroll the dough, carefully lining the bottom and sides of the pan. Trim the excess dough with a knife or by rolling the pin along the edge of the pan.

Ingredients: Mąka pszenna typ 450 lub 500
Use a tart pan with a removable bottom - it's a huge help when taking out the finished pastry. If the dough cracks while transferring, don't worry - just patch the hole with a piece of dough, pressing it with your fingers.
6

Pricking and chilling again. Prick the bottom of the pastry in the mold densely with a fork over the entire surface. This will prevent air bubbles from forming during baking. Place the mold with the pastry in the refrigerator for another 15-20 minutes. In the meantime, preheat the oven to 190°C (fan) or 200°C (conventional).

This second cooling is just as important as the first. Cold dough placed in a hot oven will experience 'thermal shock', which will make it even more crumbly.
7

Blind baking the crust. Place a piece of parchment paper on the chilled dough and weigh it down with special ceramic balls, dry beans, or peas. Put it in the preheated oven and bake for 15 minutes. After that time, carefully remove the paper with the weights and bake for another 10 minutes, until the crust is lightly golden and dry to the touch.

The weight prevents the dough from rising. Blind baking the crust is essential to prevent it from becoming soggy from the wet filling. This way, the tart base will be crispy.

Filling (Cream Base)

8

While the crust is baking, prepare the filling base. In a medium bowl, whisk the remaining 3 eggs with a whisk. Add 30% cream, grated hard cheese, salt, freshly ground pepper, and a pinch of freshly grated nutmeg. Mix everything vigorously with the whisk just until the ingredients are combined into a uniform, smooth mixture.

Ingredients: Egg, 30% cream, Aged hard cheese (e.g. gruyère, parmesan), Salt, Pieprz czarny świeżo mielony, Nutmeg
Do not whip the mixture too long to avoid aerating it - just enough for the ingredients to combine. Using freshly grated nutmeg and pepper makes a huge difference in flavor.

Preparation of Vegetables

9

In a large skillet, heat olive oil. Peel and slice the garlic into thin slices. Add it to the heated oil and sauté for about 30 seconds until it becomes fragrant. Be careful not to burn it. Add the washed and dried spinach (in batches if it doesn't fit) and sauté, stirring, for 2-3 minutes until the leaves 'wilt' and significantly reduce in volume. Season with a pinch of salt and pepper. Remove from the skillet and squeeze out excess water.

Ingredients: Extra virgin olive oil, Garlic, Fresh spinach, Salt, Pieprz czarny świeżo mielony
It is very important to thoroughly squeeze the spinach of water (e.g., in a sieve, pressing with a spoon). Too wet spinach will make the filling watery and may soften the tart base.

Assembling and Baking the Tart

10

On the pre-baked, slightly cooled base, evenly spread the drained spinach. Cut the cherry tomatoes in half and arrange them on the spinach, cut side up. Crumble the feta cheese with your fingers and sprinkle it over the vegetables. Pour the previously prepared egg and cream mixture over everything, making sure it reaches all the nooks and crannies.

Ingredients: Fresh spinach, Cherry tomatoes, Feta cheese
The crust does not need to be completely cold, but it should not be hot straight from the oven, so the eggs in the filling do not set prematurely. Pour the filling slowly to avoid disturbing the arrangement of the vegetables.
11

Optionally, sprinkle the top of the tart with fresh thyme leaves and sunflower seeds for added texture and aroma. Place the tart back in the oven, reducing the temperature to 180°C (fan) or 190°C (conventional).

Ingredients: Fresh thyme, Sunflower seeds
Optional additions will enhance the dish, but they are not necessary. You can use other herbs, such as oregano or rosemary, or other seeds, such as pumpkin seeds.
12

Bake the tart for about 30-35 minutes. The finished tart should have beautifully browned edges, and the filling should be set at the edges, but it may still gently jiggle in the center (like jelly) when you move the pan. The filling will continue to set from the residual heat.

Do not overbake the tart! If the filling is completely set in the oven, it may become dry and rubbery after cooling. A slight 'jiggle' in the center is desirable.
13

Remove the tart from the oven and set it on a rack to cool for at least 15-20 minutes before slicing. This time will allow the filling to stabilize, ensuring that the pieces have a perfect shape. After this time, carefully remove the tart from the pan.

Cutting a hot tart straight from the oven will cause the filling to spill out. Patience is key for the perfect final effect. A cooling rack allows air circulation from the bottom, which keeps the crust crispy.

Fun Fact

💡

Although sunny tarts, known as quiche, are mainly associated with France (especially the Lorraine region), their roots trace back to medieval Germany. The word 'quiche' comes from the German 'Kuchen', meaning cake. Originally, they were simple pies made from bread dough with a filling of eggs and cream, baked in bread ovens.

Best for

Tips

🍽️ Serving

Serve the tart warm or at room temperature. It pairs perfectly with a simple arugula or butter lettuce salad drizzled with lemon vinaigrette. You can cut it into neat triangles and serve it as a main dish or into smaller squares as an appetizer at a party.

🥡 Storage

Store the remaining tart in the refrigerator, covered with aluminum foil or in an airtight container, for up to 3 days. It can be eaten cold or reheated. To maintain the crispness of the crust, it's best to reheat individual pieces in an oven preheated to 160°C for about 10-15 minutes. Reheating in the microwave will make the pastry soft.

📸 Ugotowane przez społeczność

Zaloguj się, aby dodać zdjęcie
Dodaj zdjęcie gotowej potrawy

Po zatwierdzeniu przez moderatora otrzymasz 10 punktów doświadczenia.

🍲

Nikt jeszcze nie dodał zdjęcia. Bądź pierwszy!

Comments (0)

Be the first to comment on this recipe!

Add a comment

You might also like

Recipe Categories

Main Dishes
Main Dishes in: Christmas Eve Dinner

Main courses are the heart of every meal - hearty, delicious, and full of nutrients. Meats: beef, pork, poultry, and lamb in various versions. Fish and seafood: baked, fried, grilled, and stewed. Vegetarian dishes: tofu, tempeh, legumes as the main protein. Casseroles: pasta, potato, vegetable wi...

See all recipes in this category

Vegetarian cuisine is a wealth of flavors without meat - healthy, colorful, and filling. Plant-based proteins: lentils, chickpeas, beans, peas, and soy take center stage. Cheeses and dairy: feta, halloumi, ricotta, and mascarpone in main dishes. Eggs in various forms: omelets, frittata, shakshuka...

See all recipes in this category

Homemade cakes and pastries are the heart of Polish culinary tradition - sweet memories from childhood. In our collection, you will find recipes for classic yeast cakes, shortcrust, sponge, and cheesecake. Apple pie, poppy seed cake, gingerbread, Easter babka, chocolate cake, and New York cheesec...

See all recipes in this category

Dinner is the most important family meal - a time for spending time together and conversations at the table. Our collection of dinner recipes includes quick and simple dishes for everyday meals as well as more exquisite options for special occasions. You will find recipes for light diet dinners, ...

See all recipes in this category

Lunches are the main meal of the day - filling, balanced, and full of flavor. Traditional two-course lunches: soup and a main dish in Polish tradition. Pork chop with potatoes and cabbage - a classic of Polish lunches. Dumplings with meat, cheese, and fruit - hand-formed delicacies. Beef goulash,...

See all recipes in this category
Reklama