Chocolate fondants with vanilla ice cream

Valentine's Day Desserts 60 min Medium 6 wyświetleń ~59.50 PLN - (0)
Rate:
(0)
Start Cooking

Description

Delicate chocolate fondants are small cakes with a molten, hot center and lightly baked edges — a classic of French desserts, perfect for a romantic Valentine's Day. In this recipe, each fondant has an intense dark chocolate flavor and a velvety texture, served with cold vanilla ice cream, creating a contrast of temperatures and textures: hot, soft interior + cold, creamy ice cream. The dessert is visually striking (upturned, shiny domes on plates with a sprinkle of cocoa or fresh raspberries) and rich in flavor — bitter chocolate combines with vanilla and the subtle sweetness of the ice cream. Fondants are best served immediately after baking; they are great for a romantic dinner, a birthday, or as an elegant ending to a festive menu.

Ingredients (9)

Servings:
4
  • Egg 4 szt.
  • Butter 120 g
  • Dark chocolate 70% cocoa 200 g
  • White granulated sugar 120 g
  • Wheat flour 40 g
  • Vanilla ice cream 400 g
  • 🌿 Przyprawy
  • Salt 0.0 szczypt
  • ✨ Opcjonalne
  • Cocoa powder for dusting 5 g
  • Fresh raspberries 100 g
💰 Szacowany koszt dania: ~59.50 PLN (14.87 PLN/porcję)

💡 Kliknij na składnik aby oznaczyć jako użyty

Preparation steps

Preparation

1

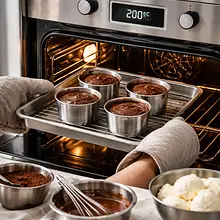
Take the butter and eggs out of the fridge about 30 minutes before preparation to reach room temperature. Also, check if the chocolate is at room temperature — this will make melting it more even. Preheat the oven to 200°C (top-bottom) or 180°C with convection.

Ingredients: Butter, Egg, Dark chocolate 70% cocoa
Use a kitchen thermometer if you have one — the oven should reach the desired temperature before placing the fondants inside. Eggs and butter at room temperature combine more easily.
2

Prepare 4 loaf pans/ramekins with a capacity of 200 ml (or 4 cocottes). Grease the inside of each with butter (use about 20 g of the 120 g of butter provided) using a brush or a piece of baking paper. Then dust the inside with a thin layer of cocoa powder (optional), turning and gently tapping to coat the walls. Set the ramekins on a baking tray.

Ingredients: Butter, Cocoa powder for dusting
Use a silicone brush or paper towel to evenly coat with butter. If you don't have cocoa, just buttering will be enough, but cocoa makes it easier to remove the fondant after baking.

Butter and chocolate

3

Break the chocolate into small pieces and cut the butter into cubes. Prepare a water bath: bring a small amount of water to a boil in a pot, then reduce the heat so that the water is just gently steaming. Place a heatproof dish (a metal or glass bowl) over the pot, ensuring the bottom does not touch the water. Add the chocolate and butter to the bowl and slowly stir with a silicone spatula until the mixture is smooth, silky, and glossy (this will take 3–6 minutes).

Ingredients: Dark chocolate 70% cocoa, Butter
Do not allow overheating — the steam should not boil vigorously. If you are using a microwave: melt the chocolate and butter in 30-second pulses, stirring after each cycle to avoid burning.

Dough

4

In a separate large bowl, crack all the eggs (240 g). Add the sugar (120 g). Whisk vigorously with a hand whisk for about 3–5 minutes, until the mixture becomes slightly lighter in color and slightly increases in volume (you don't need to achieve a very thick foam, but the mixture should be smooth and slightly fluffy).

Ingredients: Egg, White granulated sugar
If you have a hand mixer, use it on medium speed for 2–3 minutes. Whipping too long will incorporate too much air and may change the structure of the fondant.
5

Gradually pour the warm (not hot) chocolate-butter mixture into the whipped eggs with sugar, gently mixing with a silicone spatula or spoon. Add in 2-3 portions, thoroughly but gently combining the ingredients after each addition until the mixture is smooth and glossy.

Ingredients: Dark chocolate 70% cocoa, Egg, White granulated sugar
Stir in an upward motion to avoid losing too many air bubbles; at the same time, make sure the chocolate is not too hot (max. ~40°C), as it would cook the eggs.
6

Sift the flour (40 g) together with a pinch of salt (1 g) over the bowl with the mixture and gently fold it in using a spatula in 2–3 parts, making folding motions from the sides to the center. The mixture should be smooth, without visible dry lumps of flour; the consistency should be slightly thicker than liquid chocolate, but still pourable.

Ingredients: Wheat flour, Salt, White granulated sugar
Do not mix too long — just enough to combine the ingredients. If there are lumps, strain the mixture through a fine sieve.

Filling

7

Divide the mixture evenly among the prepared ramekins, filling them to about 3/4 full (this will help achieve baked sides and a molten center). Gently tap the bottoms of the ramekins on the countertop to release larger air bubbles and level the surface.

Ingredients: Butter, Wheat flour, Dark chocolate 70% cocoa, Egg
It's best to use an ice cream scoop or a small ladle to ensure the portions are even. If you are using ramekins of a different capacity, adjust the baking time accordingly.

Cooling (optional)

8

If you have time, chill the filled ramekins in the fridge for 20–30 minutes — this will help maintain a more liquid center and shorten the baking time. It's not necessary, but it gives you greater control over the consistency of the center.

Ingredients: Dark chocolate 70% cocoa, Egg
Chilling makes it easier to achieve the perfect contrast between the edges and the center. If you skip this step, bake immediately and watch the baking time.

Baking

9

Place the ramekins on a baking sheet and bake in a preheated oven at 200°C for 10–12 minutes (if they were chilled, start with 12 minutes; if not, check after 10 minutes). The cakes are ready when the top and edges are set, and the center still gently 'wobbles' when the tray is moved; the center should not be completely liquid on top, but softly flowing when touched.

Ingredients: Dark chocolate 70% cocoa, Egg, Butter
Use a timer. Baking time may vary depending on the oven and the size of the ramekins — it's better to check early than to dry them out. Key step: watch the movement of the center; overbaking will eliminate the effect of a runny interior.

Removing and serving

10

Remove the ramekins from the oven. Leave them on the baking sheet for 30–60 seconds, then run a thin knife along the edge of each ramekin to separate the cake. Invert the ramekin onto a plate (place the plate upside down and flip it vigorously, then lift the ramekin) — the fondant should come out whole. Immediately place a scoop of vanilla ice cream (about 100 g) next to the baked fondant and optionally decorate with a few fresh raspberries and a dusting of cocoa powder.

Ingredients: Vanilla ice cream, Cocoa powder for dusting, Fresh raspberries
If the fondant doesn't come out easily, gently tap the bottom of the ramekin and try a circular motion. Serve immediately — the dessert loses its temperature contrast after a few minutes.

Serving

11

Serve the fondants hot, directly after removing them from the ramekins, with a scoop of vanilla ice cream on the side. On the plate, you can add 1–2 raspberries for color and a sprinkle of sifted cocoa powder or powdered sugar for decoration. Make sure each guest receives their dessert immediately to experience the full effect of the molten center.

Ingredients: Vanilla ice cream, Fresh raspberries, Cocoa powder for dusting
Ensure a temperature contrast — take the ice cream out of the freezer just before serving, use a warmed spoon to scoop it faster.

Fun Fact

💡

Chocolate fondant, also known as 'moelleux au chocolat' or 'lava cake', gained popularity in the 1980s and 1990s; various cuisines attribute its creation to both French and American origins. The key is a short baking time that leaves a liquid center.

Best for

Tips

🍽️ Serving

Serve the fondants immediately after baking with cold vanilla ice cream or whipped cream. For a flavor contrast, use fresh tart fruits (raspberries, red currants). On the plate, you can draw a splash of fruit coulis (e.g., raspberry) and place the baked fondant on it.

🥡 Storage

Fondants taste best when fresh — it is not recommended to store baked fondants. However, you can prepare the mixture in advance and fill the ramekins, store them covered in the refrigerator for up to 24 hours, and bake them just before serving. Store the ice cream in the freezer; do not refreeze after thawing.

📸 Ugotowane przez społeczność

Zaloguj się, aby dodać zdjęcie
Dodaj zdjęcie gotowej potrawy

Po zatwierdzeniu przez moderatora otrzymasz 10 punktów doświadczenia.

🍲

Nikt jeszcze nie dodał zdjęcia. Bądź pierwszy!

Comments (0)

Be the first to comment on this recipe!

Add a comment

You might also like

Recipe Categories

Valentine's Day is a special occasion when love and romance intertwine in culinary delights. It's a time when couples celebrate their feelings, often around a shared table. Traditionally, on this day, dishes are prepared that not only please the palate but also create a magical atmosphere. A red ...

See all recipes in this category
Desserts
Desserts in: Christmas Eve Dinner

Desserts are a sweet ending to a meal that brings joy to both children and adults. In this category, we present recipes for a variety of sweets - from simple creams and mousses, to elegant panna cottas, and exquisite fruit tarts. Our desserts include both classics of Polish cuisine - fruit jelly,...

See all recipes in this category
Reklama