Autumn Pizza with Pumpkin, Goat Cheese, and Sage

Pikantne Pizza and Pasta Vegetarian Dishes Dishes for Special Occasions 105 min Medium 10 wyświetleń ~28.26 PLN - (0)
Rate:
(0)
Start Cooking

Description

This unique pizza is the essence of autumn on a plate. Instead of traditional tomato sauce, the base here is a delicate olive oil that perfectly highlights the flavors of the other ingredients. Sweet, slightly caramelized hokkaido pumpkin creates a perfect duet with bold, creamy goat cheese. The whole is complemented by aromatic, slightly crispy sage after baking and thin slivers of red onion adding a touch of spiciness. Optional additions of crunchy walnuts and a drizzle of liquid honey elevate this dish to a whole new level, creating a surprising yet harmonious composition of flavors: sweet, salty, sour, and earthy. Visually, the pizza looks incredibly appetizing thanks to the contrasting colors of orange pumpkin, white cheese, and green sage. Perfect for an elegant dinner with wine or as the star of a gathering with friends.

Ingredients (14)

Servings:
4
  • Type 00 wheat flour 500 g
  • Water 300 ml
  • Fresh yeast 25 g
  • White sugar 5 g
  • Extra virgin olive oil 0.3 łyżek
  • Hokkaido pumpkin 400 g
  • Ser kozi 150 g
  • Red onion 150 g
  • Garlic 2 ząbki
  • Fresh sage 15 g
  • 🌿 Przyprawy
  • Fine sea salt 10 g
  • Pieprz czarny świeżo mielony 2 szczypty
  • ✨ Opcjonalne
  • Walnuts 50 g
  • Liquid honey 15 g
💰 Szacowany koszt dania: ~28.26 PLN (7.07 PLN/porcję)

💡 Kliknij na składnik aby oznaczyć jako użyty

Preparation steps

Pizza dough

1

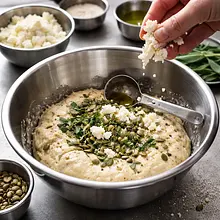
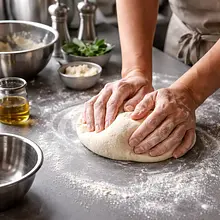
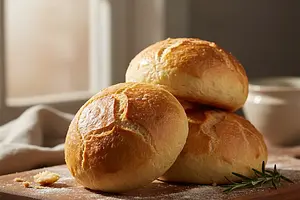
Start by preparing the yeast starter. In a small bowl or cup, place the crumbled fresh yeast. Add a teaspoon of sugar. Pour in about 100 ml of lukewarm water (from the total of 300 ml). The water should feel pleasant to the touch, like a bath for a baby, not hot! Mix everything thoroughly with a fork until the yeast and sugar are completely dissolved. Set the bowl in a warm place for about 10-15 minutes. After this time, a thick, beige foam should appear on the surface, which is a sign that the yeast is active and ready to work.

Ingredients: Fresh yeast, White sugar, Water
A common mistake: using water that is too hot, which kills the yeast. If no foam appears after 15 minutes, it means the yeast is inactive and you need to start over. A warm place can be near a radiator or a slightly heated (and turned off!) oven.
2

In a large bowl, sift the wheat flour. Sifting will aerate the flour, making the dough lighter. Add salt and mix it with the flour using a spoon. It is important that the salt does not come into direct contact with the yeast at the beginning, as it can weaken their action.

Ingredients: Type 00 wheat flour, Fine sea salt
Use a large bowl that can hold double the volume of the dough after it has risen. A flour sifter or a regular fine-mesh sieve will work perfectly.
3

Make a well in the center of the flour. Pour the risen yeast mixture into this well, along with the remaining warm water (200 ml) and 30 ml of olive oil. Using a fork or wooden spoon, gently start mixing the ingredients, incorporating the flour from the edges into the center, until a sticky, compact ball of dough forms.

Ingredients: Extra virgin olive oil
Don't worry if the dough is very sticky at this stage - that's normal. Try to combine all the ingredients in the bowl before transferring the dough to the countertop.
4

Transfer the dough to a lightly floured kitchen surface. Start kneading the dough by hand for about 10-12 minutes. The technique involves pushing the dough away from you with the heel of your hand, folding it in half, and turning it 90 degrees, repeating this motion rhythmically. After this time, the dough should become smooth, elastic, and stop sticking to your hands. If you press it with your finger, it should spring back to its shape.

Alternatively, you can use a stand mixer with a dough hook. Knead on low speed for about 8 minutes. Do not add too much flour while kneading; the dough should be soft. Patience is key!
5

Form a smooth ball from the dough. Wash, dry, and lightly coat the bowl you mixed the ingredients in with olive oil. Place the ball of dough in it and turn it so that it is coated in oil. Cover the bowl with a clean kitchen towel or plastic wrap and set it in a warm place for about 60-75 minutes. The dough should double in size during this time.

Greasing the bowl and the dough with oil will prevent the dough from drying out and forming a hard crust on its surface. Check the dough after an hour - the rising time depends on the ambient temperature.

Preparation of ingredients

6

While the dough is rising, prepare the ingredients. Wash the hokkaido pumpkin thoroughly, cut it in half, and use a spoon to remove the seeds and fibrous flesh. You don't need to peel it. Cut the pumpkin into very thin slices, about 2-3 mm thick.

Ingredients: Hokkaido pumpkin
Use a sharp chef's knife to achieve even and thin slices. The thinner the slices, the quicker they will soften during baking and won't be raw.
7

In a large skillet, heat 15 ml of olive oil. Peel the garlic and slice it thinly. Add the pumpkin slices and garlic to the heated skillet. Sauté over medium heat for 4-5 minutes, stirring occasionally, until the pumpkin is slightly softened and lightly browned. Season with salt and freshly ground pepper. Remove from the skillet and set aside to cool.

Ingredients: Extra virgin olive oil, Garlic, Fine sea salt, Pieprz czarny świeżo mielony
Pre-cooking the pumpkin ensures that it will be perfectly soft after a short baking time in high temperature. Do not sauté it for too long to avoid it falling apart.
8

Prepare the remaining ingredients. Peel the red onion and slice it into very thin wedges. Crumble the goat cheese into smaller pieces with your hands. Separate the sage leaves from the stems. If you are using walnuts, chop them coarsely.

Ingredients: Red onion, Ser kozi, Fresh sage, Walnuts
To slice the onion into wedges, cut it in half lengthwise from the root, and then slice thin pieces along the lines of the onion. This will help them retain their shape.

Shaping and baking the pizza

9

About 30 minutes before the dough finishes rising, place a pizza stone or a regular baking sheet (turned upside down) in the oven on the middle rack. Preheat the oven to the maximum temperature it offers (ideally 250°C, with fan). A strong heating of the stone or sheet is crucial for achieving a crispy crust.

A pizza stone retains and radiates heat well, creating an effect similar to a pizza oven. If you don't have one, an inverted baking sheet will work just as well. Be careful when placing and removing the pizza from the hot oven.
10

Transfer the risen dough to a work surface and gently punch it with your fist to release the gas. Divide the dough into two equal parts. Shape each part into a ball. Take one ball and cover the other with a cloth. On a floured work surface or a sheet of baking paper, start stretching the dough with your hands from the center outward, forming a circle with a diameter of about 30 cm. Try to leave a slightly thicker edge.

Avoid using a rolling pin that squeezes air bubbles out of the dough. Hand stretching will make the edges fluffy and risen. You can gently rotate the dough in your clenched fists, allowing gravity to stretch it.
11

Brush the shaped pizza base with the remaining olive oil (about 15 ml per pizza). Then evenly distribute the sautéed slices of pumpkin with garlic on top. Sprinkle with crumbled goat cheese, red onion feathers, and scatter fresh sage leaves.

Ingredients: Extra virgin olive oil, Hokkaido pumpkin, Ser kozi, Red onion, Fresh sage
Don't overload the pizza with toppings. Too many will make the dough soggy and it won't bake properly. Maintain a balance between the dough and the toppings.
12

Carefully slide the pizza (along with the baking paper, if you are using it) onto the preheated stone or baking sheet in the oven. Bake for about 10-12 minutes at 250°C, until the edges of the pizza are golden brown and crispy, and the cheese is melted and slightly browned. Prepare the second pizza in the same way.

Baking time may vary depending on the oven. Keep an eye on the pizza towards the end of baking. To easily transfer the pizza, use a large, flat cutting board or a special pizza peel, lightly dusted with flour.
13

Remove the baked pizza from the oven. Immediately after taking it out, if you are using optional ingredients, sprinkle it with coarsely chopped walnuts and drizzle lightly with liquid honey. Leave it on the board for a minute, then cut into pieces and serve immediately.

Ingredients: Walnuts, Liquid honey
Adding nuts and honey after baking will preserve their fresh taste and the crunchiness of the nuts. For cutting the pizza, it's best to use a special round cutter or a very sharp chef's knife.

Fun Fact

💡

The 'bianca' version of pizza, which is without tomato sauce, is one of the oldest forms of this dish. Before tomatoes arrived in Europe from America in the 16th century and became popular, Italian flatbreads were most often served with just olive oil, herbs, garlic, and cheese.

Best for

Tips

🍽️ Serving

Serve the pizza on a large wooden board, cut into 6 or 8 pieces. It pairs perfectly with a light arugula salad drizzled with balsamic vinegar and olive oil. A glass of chilled, dry white wine, such as Sauvignon Blanc or Pinot Grigio, is an excellent choice to drink.

🥡 Storage

Pizza leftovers can be stored in the refrigerator, tightly wrapped in aluminum foil or in a closed container, for up to 2 days. The best way to reheat it is to place it in an oven preheated to 180°C for a few minutes. This way, the crust will regain its crispiness. It is not recommended to use a microwave, as it makes the dough rubbery.

📸 Ugotowane przez społeczność

Zaloguj się, aby dodać zdjęcie
Dodaj zdjęcie gotowej potrawy

Po zatwierdzeniu przez moderatora otrzymasz 10 punktów doświadczenia.

🍲

Nikt jeszcze nie dodał zdjęcia. Bądź pierwszy!

Comments (0)

Be the first to comment on this recipe!

Add a comment

You might also like

Recipe Categories

Pizza and pasta are the perfect duet - Italian flavors that have conquered the whole world. Neapolitan pizza: thin crust, tomato sauce, mozzarella, and fresh basil. Roman pizza with a crispy edge and abundant toppings. Pizza dough: yeast-based with a long rising time for the best flavor. Pasta fr...

See all recipes in this category

Vegetarian cuisine is a wealth of flavors without meat - healthy, colorful, and filling. Plant-based proteins: lentils, chickpeas, beans, peas, and soy take center stage. Cheeses and dairy: feta, halloumi, ricotta, and mascarpone in main dishes. Eggs in various forms: omelets, frittata, shakshuka...

See all recipes in this category

Dishes for special occasions are culinary masterpieces for birthdays, anniversaries, and holidays. Grilled beef steak with herb butter - restaurant quality at home. Beef Wellington - beef in puff pastry with duxelles. Roast duck with apples - a holiday tradition in a new edition. Pink salmon with...

See all recipes in this category

Lunches are the main meal of the day - filling, balanced, and full of flavor. Traditional two-course lunches: soup and a main dish in Polish tradition. Pork chop with potatoes and cabbage - a classic of Polish lunches. Dumplings with meat, cheese, and fruit - hand-formed delicacies. Beef goulash,...

See all recipes in this category
Reklama