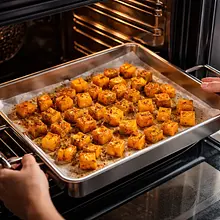
Preheat the oven to 200°C with the convection function (or 220°C without convection). Prepare a large baking tray and line it with parchment paper. The parchment will prevent the pumpkin from sticking to the tray and make it easier to clean later.
Description
Aromatic, warming, and incredibly creamy curry with roasted hokkaido pumpkin and chickpeas is the essence of Indian cuisine in an autumn version. This dish combines the natural sweetness of oven-caramelized pumpkin with the nutty flavor of chickpeas, all enveloped in a velvety, rich sauce based on coconut milk and a carefully selected blend of spices. The deep orange color of the dish invites you to eat, while the aroma of ginger, cumin, and garam masala wafting during cooking transports you straight to the streets of Delhi. It is a hearty dish, full of plant-based protein and fiber, yet easy to digest. It pairs perfectly with fluffy basmati rice or warm naan bread, allowing you to scoop up every drop of the delicious sauce. This is an excellent option for a family lunch, dinner with friends, or simply as comfort food on a cooler day.
Ingredients (19)
- Hokkaido pumpkin 600 g
- Ciecierzyca gotowana (z puszki lub słoika) 240 g
- Full-fat coconut milk (min. 17% fat) 400 ml
- Yellow onion 1.3 szt.
- Garlic 4 ząbki
- Fresh ginger 20 g
- Refined coconut oil 2 łyżki
- Koncentrat pomidorowy 30% 1.3 łyżka
- Vegetable broth 200 ml
- Ground coriander 2 g
- 🌿 Przyprawy
- Garam masala 3 g
- Ground turmeric 0.4 łyżeczek
- Kmin rzymski (kumin) mielony 1 łyżeczka
- Chili powder 1 szczypta
- Salt 0.2 szczypt
- Pieprz czarny świeżo mielony 2 szczypty
- ✨ Opcjonalne
- Fresh cilantro 30 g
- Lime juice 15 ml
- Almond flakes 20 g
💡 Kliknij na składnik aby oznaczyć jako użyty
Preparation steps
Roasted pumpkin
Thoroughly wash the hokkaido pumpkin under running water. Dry it with a paper towel. Cut the pumpkin in half using a large, sharp knife. Using a spoon, scoop out the seeds and fibrous flesh from the inside. Then, cut the pumpkin halves into cubes with sides of about 2-3 cm. Remember, you do not need to peel the hokkaido pumpkin!
Transfer the chopped pumpkin to a large bowl. Add half of the coconut oil (about 15g, or 1 tablespoon), half of the prepared salt (about 2-3g, or half a teaspoon), and a pinch of freshly ground black pepper. Mix everything thoroughly with your hands, ensuring that each piece of pumpkin is evenly coated with oil and spices.
Spread the seasoned pumpkin in a single layer on the prepared baking sheet. Place in the preheated oven and bake for 25-30 minutes. Halfway through baking (after about 15 minutes), stir the pumpkin with a spatula to ensure even browning. The pumpkin is ready when a fork easily pierces it, and its edges are slightly browned and caramelized.
Curry sauce and finishing touches
While the pumpkin is baking, prepare the rest of the ingredients. Peel the onion and chop it into small cubes. Peel the garlic cloves and crush them with a press or chop them very finely. Peel a piece of ginger (the easiest way to do this is with the edge of a small spoon) and grate it on a fine grater.
In a large pot or deep skillet with a thick bottom, heat the remaining coconut oil (15g) over medium heat. Add the chopped onion and sauté, stirring occasionally with a wooden spoon, for about 6-8 minutes, until it becomes soft, translucent, and slightly golden.
Add grated ginger and crushed garlic to the translucent onion. Sauté everything together, stirring constantly, for about 1 minute. Be careful not to burn the garlic, as it will become bitter. You should feel an intense, wonderful aroma.
Reduce the burner to the lowest setting. Add all the dry spices to the pot: garam masala, turmeric, cumin, ground coriander, and hot paprika. Also add the tomato paste. Sauté everything together, stirring constantly, for about 30-60 seconds. This is a key moment when the essential oils from the spices are released, enhancing the flavor of the entire dish.
Immediately after sautéing the spices, pour hot vegetable broth into the pot. Use a wooden spoon or spatula to scrape up all the tasty bits that have stuck to the bottom of the pot. Mix thoroughly until a smooth, aromatic sauce forms.
Pour the entire contents of the can of coconut milk into a pot. Increase the heat and bring the sauce to a gentle boil, then immediately reduce the heat so that the sauce simmers gently. Cook for 2-3 minutes, stirring, until the sauce thickens slightly.
Drain the canned chickpeas in a sieve and rinse thoroughly under cold running water. Allow them to drain well. Add the rinsed chickpeas and the previously roasted pumpkin to the pot with the sauce. Gently mix to coat all the ingredients with the sauce.
Cover the pot and cook everything on low heat for about 10-15 minutes. This time will allow the flavors to meld, and the pumpkin will absorb the aroma of the sauce while imparting its sweetness. Stir the contents of the pot gently from time to time.
Remove the pot from the heat. Taste the curry and season to taste with the remaining salt and freshly ground black pepper. If you are using optional ingredients, this is the moment to add freshly squeezed lime juice. Stir and taste again – the acidity of the lime should brighten up the entire dish.
Transfer the hot curry to bowls. Just before serving, generously sprinkle with chopped fresh cilantro. Additionally, for crunch, you can top the dish with toasted almond flakes. Serve immediately with basmati rice or naan bread.
Fun Fact
The word 'curry' comes from the Tamil word 'kari', meaning 'sauce'. It was popularized by the British during colonial times as a general term for various aromatic dishes with sauces from the Indian subcontinent. In India itself, there are countless regional variations of 'kari', each with a unique blend of spices.
Best for
Tips
Curry tastes best served hot. Serve it in deep bowls with a portion of fluffy basmati or jasmine rice that will soak up the aromatic sauce. Indian breads, such as butter naan or crispy papadums, are also excellent accompaniments, perfect for dipping in the sauce. Next to it, you can place a small bowl of thick natural (or vegan) yogurt to temper any spiciness of the dish.
Curry can be stored in an airtight container in the refrigerator for up to 3 days. Moreover, its flavor often becomes deeper and more complex the next day. Reheat on low heat in a pot, adding a little water or broth if needed to thin the sauce. It can also be frozen in portions – after thawing and reheating, it tastes almost like freshly made.
📸 Ugotowane przez społeczność
Zaloguj się, aby dodać zdjęcieDodaj zdjęcie gotowej potrawy
Po zatwierdzeniu przez moderatora otrzymasz 10 punktów doświadczenia.
Nikt jeszcze nie dodał zdjęcia. Bądź pierwszy!
Comments (0)
Be the first to comment on this recipe!
Add a comment