Homemade Muesli Bars with Nuts and Dried Fruits

Wegetariańskie Snacks Desserts for Kids Breakfasts 90 min Easy 6 wyświetleń ~26.72 PLN - (0)
Rate:
(0)
Start Cooking

Description

Discover the recipe for perfectly crunchy yet chewy muesli bars that embody the essence of a healthy and delicious snack. They are not only an alternative to store-bought sweets, full of sugar and preservatives, but also a fantastic way to use up your stock of nuts, seeds, and dried fruits. Each bite is a wealth of flavors and textures: the sweetness of honey and apricots, the deep, nutty aroma of roasted almonds and walnuts, and the crunchiness of oats and seeds. The bars are incredibly filling due to their high fiber and protein content, making them ideal fuel to start the day, an energy boost before a workout, or a nutritious snack for work or school. Their preparation is simple and allows for complete freedom in choosing your favorite ingredients, and the golden color with visible pieces of dried fruits makes them look incredibly appetizing.

Ingredients (10)

Servings:
12
  • Mountain oats 200 g
  • wildflower honey 120 g
  • Smooth peanut butter 100 g
  • Nut mixture (walnuts, almonds) 100 g
  • Shelled sunflower seeds 50 g
  • Dried apricots 80 g
  • Sea salt 1 g
  • 🌿 Przyprawy
  • Ground cinnamon 3 g
  • ✨ Opcjonalne
  • Chia seeds 30 g
  • Coconut flakes 30 g
💰 Szacowany koszt dania: ~26.72 PLN (2.23 PLN/porcję)

💡 Kliknij na składnik aby oznaczyć jako użyty

Preparation steps

Preparing the pan and dry ingredients

1

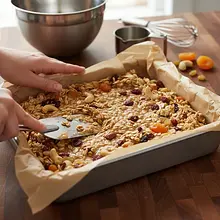
Preheat the oven to 180°C (160°C with fan). Prepare a square baking pan measuring about 20x20 cm. To ensure the parchment paper adheres perfectly and doesn't shift while pouring in the mixture, grease the bottom and sides of the pan with a little butter or oil, then line it with one piece of parchment paper so that the edges extend over the sides of the pan. This will make it easier to remove the finished block of bars later.

Use a metal or glass pan. Silicone may be too flexible. The overhanging edges of the paper act as 'handles' – don't skip this step!
2

In a large, dry skillet (without adding any fat), place the oats and the nut mixture. Toast them over medium heat for 5-7 minutes, stirring frequently with a wooden spoon, until they start to release a strong, nutty aroma and the oats and nuts are lightly browned. Be careful not to burn them, as they will become bitter. Once done, transfer the toasted ingredients to a large bowl and let them cool.

Ingredients: Mountain oats, Nut mixture (walnuts, almonds)
It's best to use a heavy-bottomed pan that distributes heat evenly. Toasting is key for flavor – it brings out the depth from the nuts and flakes.
3

When the toasted ingredients in the bowl have cooled, add the sunflower seeds and cinnamon. Chop the dried apricots into small cubes (about 0.5 cm) with a sharp knife and add them to the bowl as well. If you are using optional ingredients such as chia seeds or coconut flakes, add them now. Mix everything thoroughly with a large spoon to evenly distribute all the ingredients.

Ingredients: Shelled sunflower seeds, Dried apricots, Ground cinnamon, Chia seeds, Coconut flakes
If the apricots are hard, you can make cutting easier by lightly greasing the knife with oil. Mixing the dry ingredients well at this stage ensures that each bar will be equally delicious.

Preparation of the wet base

4

In a small saucepan with a thick bottom, place the honey, peanut butter, and a pinch of salt. Heat over low flame, stirring constantly with a silicone spatula or whisk, until the ingredients combine into a smooth, liquid mixture. This will take about 2-3 minutes. Do not bring the mixture to a boil! The goal is just to warm it up and liquefy it, which will allow it to easily combine with the dry ingredients.

Ingredients: wildflower honey, Smooth peanut butter, Sea salt
Be careful not to overheat the mixture, especially the honey, as it can lose its valuable properties and become bitter. The mixture should be smooth and warm to the touch.
5

Pour the hot, liquid honey-nut mixture immediately into the bowl with the dry ingredients. Using a sturdy wooden spoon or silicone spatula, mix everything vigorously and thoroughly until every flake, nut, and fruit is evenly coated with the sticky mixture. Make sure to reach the bottom of the bowl, where dry ingredients often accumulate.

Act quickly, as the mixture thickens and becomes harder to stir as it cools. This is the most important moment of combining – it determines whether the bars will be compact.

Shaping and Baking

6

Transfer the finished, sticky mixture to the prepared baking pan lined with parchment paper. Now for the most important step: pressing. Use the bottom of a glass, another piece of parchment paper, or a spoon dampened with water to press the mixture down very firmly and evenly into the bottom of the pan. Pay special attention to the corners. The firmer you press the mixture, the better the bars will hold their shape after baking.

Don't underestimate this step! Poorly whipped mixture will cause the bars to crumble. Spend at least 2-3 minutes on this, pressing the mixture down with all your strength.
7

Place the mold with the mixture in the preheated oven. Bake for 20-25 minutes. The bars are ready when their edges are clearly golden-brown, and the center feels firm to the touch. During baking, the kitchen will be filled with a wonderful, nutty-honey aroma.

Every oven is different, so keep an eye on the bars towards the end of baking. It's better to slightly overbake them than to take them out too early, as they will be too soft and may fall apart.

Cooling and Slicing

8

After removing from the oven, leave the pan with the bars on a metal rack to cool completely at room temperature. This is an absolutely crucial step – it will take at least 30-40 minutes. Cutting hot or even warm bars will result in them falling apart! To further firm them up and make cutting easier, after the initial cooling, place the entire pan in the refrigerator for another 20-30 minutes.

Patience is key here. Do not try to rush this process. Cold, firm bars cut perfectly and without any trouble.
9

Once the bar block is cold and firm, use the protruding edges of the parchment paper to lift it out of the pan entirely and place it on a cutting board. Use a very sharp, large knife (e.g., a chef's knife) to cut the block into 12 equal rectangles. Store the finished bars according to the instructions.

To achieve even edges, press the knife straight down instead of moving it back and forth like sawing. After each cut, you can wipe the knife to avoid residue sticking.

Fun Fact

💡

The prototype of today's granola bars was 'Granula', invented in 1863 by Dr. James Caleb Jackson. These were hard lumps made from Graham flour that required soaking in milk overnight before eating. Fortunately, today's versions are much tastier and ready to eat right away!

Best for

Tips

🍽️ Serving

The bars taste best at room temperature. They can be eaten on their own or crumbled over natural yogurt, creating a delicious granola. They pair wonderfully with a glass of milk, plant-based drink, or a cup of coffee.

🥡 Storage

Store the bars in an airtight container at room temperature for up to a week. To keep them fresh longer (up to 2-3 weeks), store them in the refrigerator, separated by pieces of parchment paper. They can also be frozen - wrap each bar individually in paper and place them in a zip-lock bag. They will last in the freezer for up to 3 months.

📸 Ugotowane przez społeczność

Zaloguj się, aby dodać zdjęcie
Dodaj zdjęcie gotowej potrawy

Po zatwierdzeniu przez moderatora otrzymasz 10 punktów doświadczenia.

🍲

Nikt jeszcze nie dodał zdjęcia. Bądź pierwszy!

Comments (0)

Be the first to comment on this recipe!

Add a comment

You might also like

Recipe Categories

Snacks
Snacks in: New Year's Eve

Snacks are the perfect way to make the wait for midnight more enjoyable; they should be small but impressive.

See all recipes in this category
Desserts for Kids
Desserts for Kids in: For Kids

Desserts for kids are sweet treats without guilt - less sugar, more flavor. Banana ice cream without sugar - frozen bananas blended to a creamy consistency. Chocolate mousse with avocado - creamy and healthy. Vanilla pudding with fruit - a childhood classic. Carrot and apple muffins - hidden vege...

See all recipes in this category

Breakfast is the most important meal of the day - energy for a good start and a tasty morning. Scrambled eggs, fried eggs, poached eggs, and omelets - protein classics. Oatmeal with fruits, nuts, and honey - a healthy and filling fit breakfast. American pancakes and French crepes - a sweet start ...

See all recipes in this category

Vegetarian cuisine is a wealth of flavors without meat - healthy, colorful, and filling. Plant-based proteins: lentils, chickpeas, beans, peas, and soy take center stage. Cheeses and dairy: feta, halloumi, ricotta, and mascarpone in main dishes. Eggs in various forms: omelets, frittata, shakshuka...

See all recipes in this category
Reklama