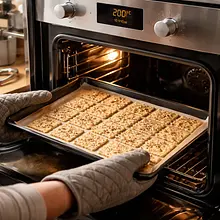
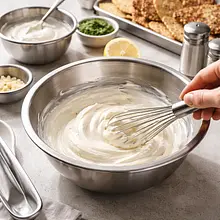
Prepare your workspace: take out a mixing bowl, a rolling pin, baking paper, a large knife or pastry cutter, a grater for optional decoration, and a baking tray. Preheat the oven to 200°C with fan (if you only have top-bottom heating, set it to 220°C). Line the baking tray with baking paper.
Description
Delicately golden, thin, and very crispy crackers served with a creamy, herby dip — the perfect Valentine's snack to share. The crackers can be made at home with simple ingredients: flour, butter, and oil, rolled out very thin, sprinkled with sesame seeds or chili flakes (optional), and baked until crispy. The dip combines cream cheese with Greek yogurt, fresh dill, chives, garlic, and lemon juice — it is smooth, slightly tangy, and aromatic, contrasting well with the neutral, buttery-oily flavor of the crackers. Serve as a Valentine's snack on a large board, garnished with lemon zest and fresh herbs; it looks appealing and encourages sharing. Visually, the dish combines golden, irregular crackers with a creamy, light green dip, creating a romantic impression.
Ingredients (14)
- Wheat flour 250 g
- Butter 50 g
- Water 60 ml
- Olive oil 15 ml
- Cream cheese 200 g
- Greek yogurt 150 g
- Garlic 2 ząbki
- Lemon juice 15 ml
- Fresh dill 0.8 pęczek
- 🌿 Przyprawy
- Salt 0.2 szczypt
- Chives 0.1 pęczków
- Black pepper 2 szczypty
- ✨ Opcjonalne
- Sesame 20 g
- Chili flakes 2 szczypty
💡 Kliknij na składnik aby oznaczyć jako użyty
Preparation steps
Preparation - plan
Crackers - dough
In a large bowl, sift 250 g of wheat flour. Add 5 g of salt and mix the dry ingredients with a wooden spoon for 10-15 seconds to evenly distribute the salt. Cut 50 g of cold butter into small pieces and add to the bowl with the flour.
Rub the butter into the flour with your fingers (the 'crumb' method) until the mixture resembles coarse crumbs – there should be a few larger pieces of butter remaining (about 1-2 minutes). If you are using a mixer, pulse the hooks briefly to avoid overheating the butter.
Add 15 g of olive oil and 60 ml of cold water to a bowl. Start mixing with a fork or spatula, gathering the flour from the edges to the center until the dough begins to come together. If the dough is too dry, add a maximum of 1-2 tablespoons (15–30 ml) of additional water; if it is too sticky, sprinkle a little flour (10 g). Work quickly: combine the ingredients to form a compact, slightly moist ball.
Crackers - cooling
Form a flat disk from the dough about 2 cm thick, wrap it tightly in plastic wrap, and set it in the refrigerator for 30 minutes. Chilling will make rolling easier and ensure the crackers are crispy.
Remove the baking sheet and let the crackers sit on the sheet for 5 minutes, then gently transfer them to a cooling rack to cool completely. They will reach their full crispness after cooling to room temperature (about 20–30 minutes).
Crackers - shaping
Take the dough out of the fridge. Divide the disk into 2 parts (it's easier to roll out). On a lightly floured surface, roll out one part into the thinnest possible flatbread — ideally 1–2 mm; the thinner, the crispier it will be after baking. If it sticks to the rolling pin, sprinkle a little flour.
Crackers - cutting and preparing for baking
Using a knife, pastry cutter, or sharp knife, cut the rolled-out dough into rectangles or squares measuring about 4×4 cm. Transfer them to a baking sheet lined with parchment paper, leaving small gaps between them (about 1 cm). Use the sharp end of a fork to poke each cracker in several places (known as docking) — this will prevent excessive puffing.
Crackers - toppings before baking
Before baking, gently brush the surface of the crackers with a brush dampened with olive oil. Evenly sprinkle 20 g of sesame on part of the crackers and optionally 2 g of chili flakes on another part if you want a spicy version. Leave the remaining ones without toppings for contrast.
Crackers - baking
Place the tray in the preheated oven. Bake at 200°C with convection for 10–14 minutes. After 7–8 minutes, check the color — the edges should start to lightly brown. Remove the crackers from the oven when they are evenly browned at the edges and lightly golden on the surface; remember that they will become even harder after being taken out of the oven.
Dip - preparing the ingredients
In a bowl, place 200 g of cream cheese and 150 g of Greek yogurt. Squeeze in 15 g (1 tablespoon) of lemon juice. Peel and finely chop or press 10 g of garlic (2 cloves) through a garlic press. Finely chop 15 g of dill and 10 g of chives.
Dip - mixing
Mix the cheese and yogurt with a hand whisk or spoon for about 1–2 minutes until the mixture is smooth and uniform. Add the pressed garlic, lemon juice, chopped herbs, and 1 pinch (1 g) of black pepper. Mix again for 30–45 seconds and taste, adjusting salt or pepper to your liking (if you want more acidity, add another 1/2 teaspoon of lemon juice).
Assembly and serving
Transfer the dip to a decorative bowl or a small dish in the center of a plate. Arrange the cooled crackers around it or on a serving board in a fan shape. Garnish the dip with additional chopped dill, lemon zest, or a few sesame seeds. Serve immediately to maintain the crispness of the crackers.
Final tips
If you are preparing the snack in advance, store the crackers in an airtight container after they have completely cooled (see storage tips). Keep the dip in the refrigerator in a closed container for up to 48 hours and take it out 20 minutes before serving to bring it to a milder temperature.
Fun Fact
Crackers historically originate from simple dried bread and were baked as a durable, portable food — the name 'cracker' refers to their crisp, breaking nature.
Best for
Tips
Serve the crackers on a large board with dip in the center, adding some fresh herbs, cucumber slices, or grapes around for contrast in flavor and color. For variety, prepare 2 versions of the dip: one herb-based and the other with roasted peppers. Arranging the crackers partially overlapping creates a 'petal' effect, perfect for a romantic table.
Store completely cooled crackers in an airtight container at room temperature for up to 5 days — moisture will cause them to lose their crunch. Store the dip in the refrigerator for up to 48 hours in a closed container; take it out 20–30 minutes before serving. Do not freeze dairy-based dip (it loses its consistency).
📸 Ugotowane przez społeczność
Zaloguj się, aby dodać zdjęcieDodaj zdjęcie gotowej potrawy
Po zatwierdzeniu przez moderatora otrzymasz 10 punktów doświadczenia.
Nikt jeszcze nie dodał zdjęcia. Bądź pierwszy!
Comments (0)
Be the first to comment on this recipe!
Add a comment