Mini pizzas with cheese and ham

Pikantne Valentine's Day Snacks 90 min Medium 17 wyświetleń ~24.57 PLN - (0)
Rate:
(0)
Start Cooking

Description

Small, romantic mini pizzas with cheese and ham are the perfect snack for Valentine's Day — crispy edges, soft dough interior, aromatic tomato sauce, and stretchy mozzarella arranged in the shape of hearts. The recipe combines simple, seasonal ingredients and allows you to prepare 12 handy mini pizzas, which are great as an accompaniment to wine, a buffet, or as a main appetizer during a dinner for two. In the description, you will find exact measurements, kneading and rising times for the dough, instructions for shaping the mini pizzas into heart shapes, as well as tips on how to recognize the finished stages of preparation (e.g., when the dough has risen well, how to assess the degree of cheese browning). The dish is visually impressive and easy to modify — you can add fresh basil, chili flakes, or parmesan to enhance the flavor.

Ingredients (15)

Servings:
12
  • Wheat flour 400 g
  • Water 250 ml
  • Fresh yeast 20 g
  • sugar 10 g
  • Olive oil 30 ml
  • Tomato passata 200 g
  • Garlic 2 ząbki
  • Dried oregano 4 g
  • Cooked ham 200 g
  • Mozzarella cheese 300 g
  • 🌿 Przyprawy
  • Salt 8 g
  • Black pepper 2 szczypty
  • ✨ Opcjonalne
  • Fresh basil 0.3 pęczków
  • Chili flakes (optional) 2 szczypty
  • Parmesan (optional) 30 g
💰 Szacowany koszt dania: ~24.57 PLN (2.05 PLN/porcję)

💡 Kliknij na składnik aby oznaczyć jako użyty

Preparation steps

Cake

1

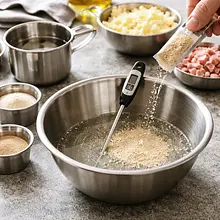
Prepare the yeast starter. Heat 250 ml of water to a temperature of 35-38°C — the water should be warm but not hot (check with the inside of your wrist). Crumble 20 g of fresh yeast into a bowl, add 10 g of sugar and 50 ml of warm water from the prepared amount. Stir with a spoon until the yeast dissolves and set aside for 8-10 minutes. After this time, a light foam or 'cap' should appear on the surface, indicating that the yeast is active.

Ingredients: Fresh yeast, Water, sugar
Use a small bowl and a spoon or fork. If there is no foam after 10 minutes, the yeast may be inactive — start again with fresh yeast. Do not use hot water (>45°C) as it will kill the yeast.
2

In a large bowl (or in a stand mixer bowl), sift 400 g of flour and mix with 8 g of salt. Make a well in the flour. Pour the activated yeast starter into the well, add the remaining lukewarm water (about 200 ml) and 30 g of olive oil. Start mixing with a wooden spoon or dough hook, first mixing the center, then gradually incorporating the flour from the sides until a sticky dough forms.

Ingredients: Wheat flour, Salt, Water, Olive oil, Fresh yeast
Use a mixer with a dough hook if you have one; set it to low speed. If you don't have a mixer, stir with a wooden spoon, then knead by hand on a lightly floured surface.
3

Knead the dough for 8-10 minutes: if using a mixer, knead on medium speed for 6-8 minutes; if by hand, knead for 8-10 minutes, stretching and folding the dough. The dough is ready when it is smooth, elastic, and stops sticking strongly to your hands — a slight stickiness is acceptable.

Ingredients: Wheat flour, Olive oil
The best tool is a dough hook or hands dusted with a little flour. Do not add too much flour — the dough should remain soft. If the dough is too sticky, add a maximum of 1 tablespoon (15 g) of flour at a time.
4

Place the kneaded dough in a large bowl lightly greased with oil (grease the bottom and sides with oil), cover the bowl with a clean cloth or plastic wrap. Set aside in a warm, draft-free place for 60 minutes, until it doubles in size. After 30 minutes, you can quickly fold the dough: gently press it from the sides to the center to improve the structure – this will enhance the rising.

Ingredients: Wheat flour, Olive oil
Use a bowl with a capacity of at least 3 liters. A warm place can be, for example, an oven that is turned off but has the light on, or a countertop near a radiator. The dough is ready for further work when it doubles in volume and lightly springs back when you press it with your finger.

Sauce

5

Meanwhile, prepare the sauce: in a small saucepan, heat 1 tablespoon of olive oil (about 15 g) over medium heat for 30 seconds, add 10 g of chopped garlic and sauté for 20-30 seconds until fragrant and lightly golden (not burnt). Pour in 200 g of tomato passata, add 4 g of oregano and 1 g of pepper, season with 2 g of salt (if desired) and simmer on low heat for 6-8 minutes, stirring occasionally. The sauce should thicken slightly and have a concentrated tomato flavor.

Ingredients: Olive oil, Garlic, Tomato passata, Dried oregano, Black pepper, Salt
Use a saucepan with a diameter of 16-18 cm. If the sauce is too watery, cook for an additional 1-2 minutes. Do not fry the garlic for too long — it will become bitter.

Preparation for shaping

6

Preheat the oven to 240°C (top-bottom) and place the baking tray in the middle. Prepare a work surface or countertop dusted with a thin layer of flour. Remove the risen dough onto the floured surface and gently deflate it: press with your hands to release excess air.

Ingredients: Wheat flour
Use a pizza stone if you have one — heat it for at least 30 minutes before baking. The baking tray should be heated along with the oven to make the bottoms of the pizzas crispier.

Shaping

7

Divide the dough into 12 equal parts. The easiest way to do this is to split it in half, then divide each half into 6 parts. Shape each part into a ball, pressing underneath to make the bottom tight. Flatten the ball with your hand into a disc about 10-12 cm in diameter. To shape a heart: form a slightly elongated oval from the disc, then make a small indentation at the top with your finger or the end of a spoon, creating the characteristic notch. You can also use a heart-shaped mold — gently pressing the dough into the mold.

Ingredients: Wheat flour
Use your hands and, if necessary, a rolling pin to lightly roll out. Do not roll too thin — a thickness of about 5-7 mm will ensure a soft interior. If the dough springs back, wait 5 minutes and try again.

Assembling

8

On each prepared base, spread about 15-18 g of tomato sauce (a tablespoon), evenly leaving a 1 cm border without sauce. On the sauce, place pieces of ham (about 15-18 g per piece, arrange in the shape of a heart or crumble thin slices into smaller pieces), then distribute 25 g of chopped mozzarella (you can use sliced or torn mozzarella). Don't overdo it with the cheese to prevent the mini pizzas from becoming soggy.

Ingredients: Tomato passata, Cooked ham, Mozzarella cheese, Parmesan (optional)
Use a tablespoon to apply the sauce and a small teaspoon to spread it evenly. Additionally, you can add a sprinkle of parmesan to enhance the flavor.

Baking

9

Place the prepared mini pizzas on a preheated baking sheet (you can bake in two batches if they don't all fit at once). Bake at 240°C for 10-12 minutes — check after 8 minutes: the edges should be golden and crispy, the cheese melted and slightly browned. If you are using a pizza stone, bake for 8-10 minutes.

Ingredients: Mozzarella cheese, Cooked ham
Use a spatula or large spoon to transfer the mini pizzas to the baking sheet. The best baking sheet is a thin steel baking tray or a pizza stone. Do not open the oven too often — you lose temperature.

Finishing and serving

10

Remove the mini pizzas from the oven and set them on a rack to cool slightly (2-3 minutes). Drizzle each piece with a little olive oil (a few drops), and sprinkle with fresh basil leaves. If using, sprinkle with a bit of Parmesan and (optionally) chili flakes to taste.

Ingredients: Olive oil, Fresh basil, Parmesan (optional), Chili flakes (optional)
Use a sauce dispenser or a teaspoon to drizzle with olive oil. Basil tastes best when added just before serving, so it doesn't wilt.

Serving

11

Arrange the mini pizzas on a large plate or serving board in the shape of a heart or artistically spread out. Serve warm — best immediately after preparation. Recommended accompaniments: a glass of white wine, a milkshake, or a light arugula salad.

Use a large wooden board for an aesthetic presentation. The mini pizzas taste best warm, but they can also be served at room temperature.

Fun Fact

💡

Pizza originates from Naples, but mini versions and creative shapes (e.g., hearts) became popular when pizza started being served as a snack at parties and events, including romantic occasions.

Best for

Tips

🍽️ Serving

Serve the mini pizzas warm, arranged on a wooden board. For decoration, use a few fresh basil leaves and grated Parmesan for contrast. For a more elegant presentation, decorate the plate with drops of balsamic cream or truffle oil (a few drops on the plate).

🥡 Storage

Store in the refrigerator in an airtight container for up to 24 hours. To reheat, use an oven preheated to 180°C for 6-8 minutes or a toaster to restore crispiness. Avoid the microwave, as the bottom will become rubbery.

📸 Ugotowane przez społeczność

Zaloguj się, aby dodać zdjęcie
Dodaj zdjęcie gotowej potrawy

Po zatwierdzeniu przez moderatora otrzymasz 10 punktów doświadczenia.

🍲

Nikt jeszcze nie dodał zdjęcia. Bądź pierwszy!

Comments (0)

Be the first to comment on this recipe!

Add a comment

You might also like

Recipe Categories

Valentine's Day is a special occasion when love and romance intertwine in culinary delights. It's a time when couples celebrate their feelings, often around a shared table. Traditionally, on this day, dishes are prepared that not only please the palate but also create a magical atmosphere. A red ...

See all recipes in this category
Snacks
Snacks in: Valentine's Day

Perfect for small cravings during a romantic evening, light snacks that will delight with their flavor.

See all recipes in this category
Reklama